All the time, through thousands of years of existence, humans have tried to record their knowledge, thoughts, impressions – in other words, the information that was important to them – to make it available to other humans. As human civilization evolved, different ways to store information were used. Our prehistoric ancestors painted on cave walls. Later, people carved texts on wax, clay or stone. Egyptians wrote on papyrus, others on parchment scrolls. Then for centuries, and especially since Gutenberg invented the printing press in mid-fifteenth century, paper books have been our main storage medium.
But following this we have seen the advent of fast personal computers and digital screens, and we might think that the age-old dominance of printed books is coming to an end. Just as floppy disks are no longer used to store or transfer information between computers, will the same happen to printed books? Will they be replaced by their electronic counterparts, the eBooks?
To many of us, eBooks are incommensurably superior to traditional paper books. eBooks are browsed or searched much more easily. eBooks are also easier to publish: they don't require printing, binding, they don't waste paper and ink, they will always be more compact than printed books. Any modern eBook reader with a size not larger than an average paper book can already store an amount of eBooks equivalent to a small library of printed books. eBooks have plenty of advantages over printed books. Some people believe that in a not too distant future printed books will only be kept in museums and private collections of bibliophiles. Who knows, maybe paper books are like dinosaurs whose time of extinction is nearing?
However, we know that there are still people who will always prefer the smell of ink and the feel of paper of the printed books they knew in "the good old days".
Where do you stand on this?
Below are various links to topical articles. We hope they'll help you form an unbiased educated opinion.
Some Thoughts About E-Reading
Ebooks vs. Paper Books
E-book vs. Paper Book
Publishing: ebooks vs. Paper Books
Environmental Impact Of E-Books vs. Paper Books
Ebooks Versus Paper Books: The Pros and Cons
How Green Is My iPad?
Testing the iPad's Trip-Worthiness
Monday, April 26, 2010
Tuesday, April 20, 2010
Automatic text wrapping
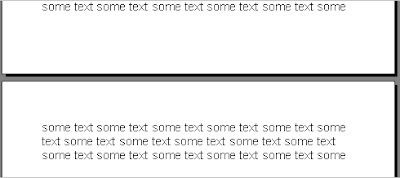
There is one thing which all word processors do, and which is as natural for word processors to do as it is natural for rivers to flow. It is automatic text wrapping. What does this mean? "Automatic" means that you don't have to worry about it, word processors do it automatically for you. "Text wrapping" means that all newly typed text is carried over to the next paragraph line as soon as that text becomes too long to fit the screen. As a general rule, the maximal width allowed for a paragraph line is limited by the width and margins of the current page. When new text cannot be added to a line because it would exceed the boundary set for the lines of the current paragraph, word processors automatically wrap the text around. It isn't actually the case, but things then look as if line breaks had been inserted to wrap text around:
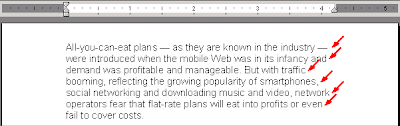
In the above picture, these virtual line breaks have been marked with red arrows. We say "virtual" because word processors do not automatically insert hard-coded line breaks in documents. "Virtual" or automatic line breaks terminating paragraph lines are dynamic: they are used only temporarily to lay the text out in the document window, or on the pages sent to the printer. When you edit a paragraph and add or remove words, word processors automatically create new automatic line breaks allowing the paragraph text to nicely reflow from one paragraph line over to the next line. Note that these ad hoc automatic line breaks are never saved to the document files. The paragraphs of saved documents only contain a continuous flow of text. But line breaks are automatically created again when you open a document.
Even though most of us do not even notice it, this is how all word processors work, including Atlantis.
Now there are cases when you might want such automatic line breaks to be saved to the document files. The most typical case is when you save a document as a plain text file. When plain text files are viewed in plain text editors, their paragraphs are either displayed as one continuous unbroken line, or wrapped around at window edge or after a set column value. But in any case the resulting layout would most likely be different from the one found in Atlantis: the line breaks would be inserted in different places.
If it is important to you to have the same line breaks in plain text editors as you get in Atlantis, you need to place actual hard-coded breaks at the end of each line in the original document in Atlantis. Here is how this can be done:
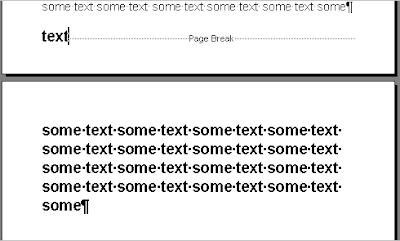
1. Open the target document in Atlantis, and select the fragment of document (one or multiple paragraphs) whose automatic line breaks you want to replace with hard-coded breaks.
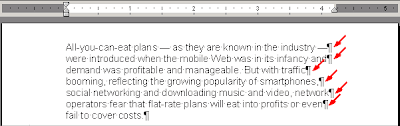
2. Click the "Split paragraphs" toolbar button, or press the Ctrl+Shift+K,U hot key. Atlantis will automatically place paragraph end marks at the end of each paragraph line within the document selection. Note that paragraph end marks are visible only when the "View | Special Symbols" mode is on:
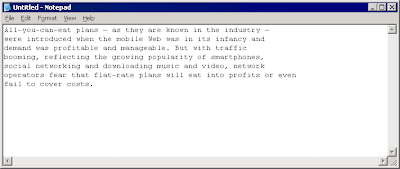
If you then save your document as a plain text file, and open it in a plain text editor like Notepad, you will get the same text wrapping (line breaks) as you had in the original source document in Atlantis:
Note that the "Split paragraphs" toolbar button is by default available through the Alternative toolbars in Atlantis. You might need to press Ctrl key twice to access this toolbar button.
Also a note regarding the Ctrl+Shift+K,U hot key. It is a so called compound hot key in Atlantis. Compound hot keys are 4-steps hot keys. You must:
1. Hold the Ctrl and Shift keys pressed,
2. Press and release the K key,
3. Press and release the U key,
4. Finally release the Ctrl and Shift keys.
You will find more information on compound hot keys in the corresponding topic of the Atlantis Word Processor Help.

In the above picture, these virtual line breaks have been marked with red arrows. We say "virtual" because word processors do not automatically insert hard-coded line breaks in documents. "Virtual" or automatic line breaks terminating paragraph lines are dynamic: they are used only temporarily to lay the text out in the document window, or on the pages sent to the printer. When you edit a paragraph and add or remove words, word processors automatically create new automatic line breaks allowing the paragraph text to nicely reflow from one paragraph line over to the next line. Note that these ad hoc automatic line breaks are never saved to the document files. The paragraphs of saved documents only contain a continuous flow of text. But line breaks are automatically created again when you open a document.
Even though most of us do not even notice it, this is how all word processors work, including Atlantis.
Now there are cases when you might want such automatic line breaks to be saved to the document files. The most typical case is when you save a document as a plain text file. When plain text files are viewed in plain text editors, their paragraphs are either displayed as one continuous unbroken line, or wrapped around at window edge or after a set column value. But in any case the resulting layout would most likely be different from the one found in Atlantis: the line breaks would be inserted in different places.
If it is important to you to have the same line breaks in plain text editors as you get in Atlantis, you need to place actual hard-coded breaks at the end of each line in the original document in Atlantis. Here is how this can be done:
1. Open the target document in Atlantis, and select the fragment of document (one or multiple paragraphs) whose automatic line breaks you want to replace with hard-coded breaks.
2. Click the "Split paragraphs"
toolbar button, or press the Ctrl+Shift+K,U hot key. Atlantis will automatically place paragraph end marks at the end of each paragraph line within the document selection. Note that paragraph end marks are visible only when the "View | Special Symbols" mode is on:
If you then save your document as a plain text file, and open it in a plain text editor like Notepad, you will get the same text wrapping (line breaks) as you had in the original source document in Atlantis:

Note that the "Split paragraphs"
toolbar button is by default available through the Alternative toolbars in Atlantis. You might need to press Ctrl key twice to access this toolbar button.Also a note regarding the Ctrl+Shift+K,U hot key. It is a so called compound hot key in Atlantis. Compound hot keys are 4-steps hot keys. You must:
1. Hold the Ctrl and Shift keys pressed,
2. Press and release the K key,
3. Press and release the U key,
4. Finally release the Ctrl and Shift keys.
You will find more information on compound hot keys in the corresponding topic of the Atlantis Word Processor Help.
Tuesday, April 13, 2010
Automatic Q&A patterns
There are plenty of situations in real life, —hence in documents—, where questions alternate with answers in a regular manner: dialogs in movies, television and radio plays, court depositions, celebrity interviews, school tests, etc.
If you write this kind of documents or scripts yourself, you probably often wished there was a way to automate the task of entering the Q&A tags or the names of the characters in your dialogs. This is actually possible. You can use styles in such a way that a pattern of question and answer tags following each other is created whenever you press the Enter key. You won't have to type the Q&A tags or character names yourself. They will be inserted automatically.
We have composed a sample document demonstrating the use of styles to create automatic Q&A patterns. You can download this document from the Sample documents page of the Atlantis site, or by clicking the following direct link:
Questions and answers.rtf
Then open the document in Atlantis. The styles in this sample document have been designed in such way that you can create new "question" or "answer" paragraphs simply by clicking the Enter key. This sample document also contains detailed explanations and instructions.
Friday, April 9, 2010
Break gracefully (2)
In the previous blog post, we suggested using the "page break before" paragraph formatting attribute as a safe way to add manual page breaks to documents. But there is still one more way to insert manual page breaks "safely" into documents.
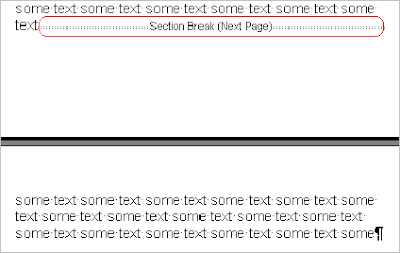
In Atlantis, a document can be divided into multiple sections, and each document section can have its own headers/footers, page size and margins, footnote/endnote settings, etc. Two neighboring sections are always separated with a special nonprinting symbol called Section Break. When the "View | Special Symbols" mode is on, the Section Break symbols are visible. They look very much like Page Break symbols:
When you insert a section break into a document, the corresponding section is automatically divided up into two sections at the current cursor location. Section breaks can be inserted through the "Insert | Break | Section Break" menu, with a choice of four different types:
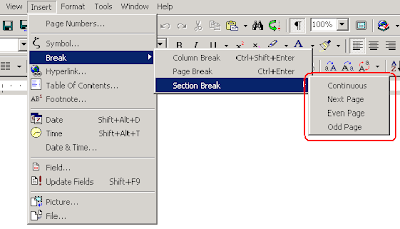
When you choose the "Next Page" section break type, the newly inserted Section Break works in many ways like any ordinary manual Page Break: any text following the Next Page section break will automatically be carried over to the next page. But there is still one important difference. Section breaks never create the kind of formatting problems that we have seen are inherent in the use of manual Page breaks (see previous blog entry). This is because the Section Break symbols always terminate the paragraphs they belong to: they actually always function as paragraph end marks. In other words, the paragraph end marks (pilcrow symbols) terminating ordinary paragraphs:

are absent from the paragraphs containing section breaks. These are terminated by Section Break symbols instead.
As you might recall (see previous blog entry), a manual "Page Break" symbol not only signals the end of the page it sits on, but it is also the first part of a paragraph whose rest is automatically carried over to the next page. Such "Page Break symbol paragraphs" always straddle two pages. On the contrary, Section breaks never break paragraphs across page boundaries. This is why section breaks could never create the kind of problems we have seen are possible with ordinary manual page breaks.
So section breaks can create "safe" page breaks in a document. However, section breaks should not be used as a substitute for ordinary page breaks. This is because section breaks normally play a much more important role in a document than just creating breaks in the text flow. Each document section bears a lot of specific formatting properties. So new sections (and consequently new section breaks) should be created only when they are actually needed: for example, when you want to have a different set of headers/footers for a particular fragment of document.
In Atlantis, a document can be divided into multiple sections, and each document section can have its own headers/footers, page size and margins, footnote/endnote settings, etc. Two neighboring sections are always separated with a special nonprinting symbol called Section Break. When the "View | Special Symbols" mode is on, the Section Break symbols are visible. They look very much like Page Break symbols:

When you insert a section break into a document, the corresponding section is automatically divided up into two sections at the current cursor location. Section breaks can be inserted through the "Insert | Break | Section Break" menu, with a choice of four different types:

When you choose the "Next Page" section break type, the newly inserted Section Break works in many ways like any ordinary manual Page Break: any text following the Next Page section break will automatically be carried over to the next page. But there is still one important difference. Section breaks never create the kind of formatting problems that we have seen are inherent in the use of manual Page breaks (see previous blog entry). This is because the Section Break symbols always terminate the paragraphs they belong to: they actually always function as paragraph end marks. In other words, the paragraph end marks (pilcrow symbols) terminating ordinary paragraphs:

are absent from the paragraphs containing section breaks. These are terminated by Section Break symbols instead.
As you might recall (see previous blog entry), a manual "Page Break" symbol not only signals the end of the page it sits on, but it is also the first part of a paragraph whose rest is automatically carried over to the next page. Such "Page Break symbol paragraphs" always straddle two pages. On the contrary, Section breaks never break paragraphs across page boundaries. This is why section breaks could never create the kind of problems we have seen are possible with ordinary manual page breaks.
So section breaks can create "safe" page breaks in a document. However, section breaks should not be used as a substitute for ordinary page breaks. This is because section breaks normally play a much more important role in a document than just creating breaks in the text flow. Each document section bears a lot of specific formatting properties. So new sections (and consequently new section breaks) should be created only when they are actually needed: for example, when you want to have a different set of headers/footers for a particular fragment of document.
Wednesday, April 7, 2010
Break gracefully
What happens when you try to add text to the last page of a document and there isn't enough space left to accommodate that new text? A new page is automatically created, and the text is carried over into the next page.
Now what if you do not want to wait until the current page gets filled up? What if you want to start afresh on a new page at once? The solution that comes to mind straightaway to most people is: "I only need to press Ctrl+Enter". That's right: Ctrl+Enter inserts a so-called manual page break symbol (or simply page break) into documents at the current location. When the "View | Special Symbols" mode is enabled, a page break symbol looks in this way:
Whenever Atlantis encounters this symbol within the flow of a document text, it creates a new page in the document, and carries all further text over to that new page.
To many, this is the most obvious method to forcefully create new pages in a document. But in spite of its simplicity, this method should be avoided whenever possible, especially by inexperienced users.
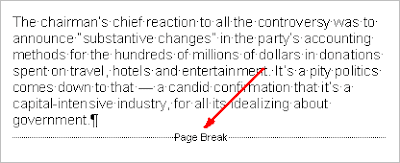
This is because the page break symbol in reality belongs to the paragraph carried forward to the next page. The page break symbol and the paragraph body that follows on the next page are actually one single paragraph ending with a common "paragraph end mark" (the so-called "pilcrow" symbol). When you insert a page break into a document, you create a new paragraph which is automatically broken into two parts:
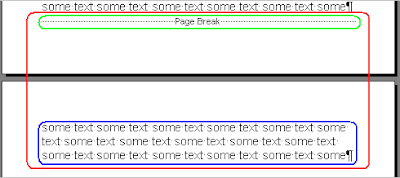
The beginning of the paragraph (highlighted in green above) is essentially the page break symbol itself and remains on the page it was inserted into. The rest of the paragraph (highlighted in blue above) is carried over to the next page even though it comes right after the page break symbol. In the above picture, the whole of the paragraph straddling two pages is marked with a red border.
So a "Page Break" symbol not only signals the end of the page it sits on, but it is also part and parcel of the paragraph carried forward to the next page.
When the "View | Special Symbols" mode is on, the paragraph end marks terminating all paragraphs are easily seen:
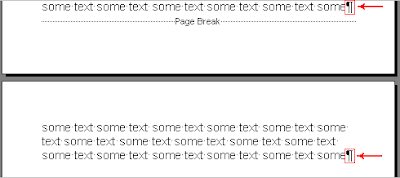
But when this same "View | Special Symbols" mode is off, the paragraph end marks are not showing. It is then often very difficult to detect that a paragraph beginning with a "Page Break" symbol actually straddles two pages:
This is why paragraphs containing "Page Break" symbols are often a source of problems in documents.
Let's take up the same example.
If we place the cursor right before the first character of our "Page Break paragraph" on page #2:

and apply the "Heading 1" style to this paragraph, it might look as if only the second part of the paragraph was affected by this change:

This is simply because the change in the formatting applied to the "Page Break" symbol does not show: as a symbol, its display is unchangeable. But even then, any paragraph formatting applied to a "Page Break paragraph" will affect both parts of it on either side of the interpage divide.
So the "Heading 1" style was actually applied to the part of our paragraph on page #2, but also to the part remaining on page #1. This is easily demonstrated if we click at the end of page #1 right before the "Page Break" symbol, then type new text. It will automatically be formatted with a larger font size and bold attribute, i.e. with the formatting associated with the corresponding paragraph, that of the "Heading 1" style:
So "Page Break symbol paragraphs" can be a source of various formatting problems.
But this is not all. When they are referenced in a table of contents, both parts of these "Page Break symbol paragraphs" automatically get included in the corresponding table items. Sometimes with unexpected and undesirable results.
These are only a few examples of the many problems that can be created by "Page Break symbol paragraphs". This is why it is preferable to avoid inserting these "Page Break" symbols in documents.
Now you might ask "how do I create page breaks safely then?"
Here is how:
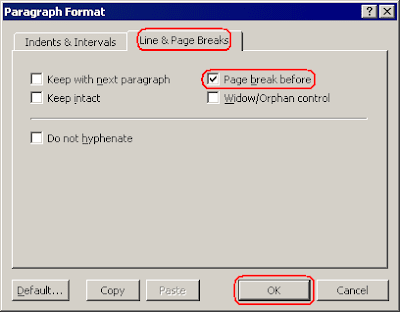
1) Click within the paragraph to be placed on the new page after the page break.
2) Run the "Format | Paragraph..." menu command, or press the associated hot key Ctrl+Shift+G.
3) In the "Paragraph Format" dialog, click to show the "Line & Page Breaks" tab, check the "Page break before" box, and OK out of the dialog:
The target paragraph will automatically be carried forward to the top of a new page. If the "View | Special Symbols" mode is on, you will notice a special mark on the left of the first line of that paragraph:
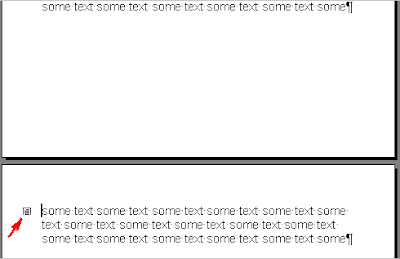
This kind of mark indicates that the corresponding paragraph will always be placed at the top of the page it is located in.
Note that toggling the "Page break before" attribute for a paragraph can also be done with the corresponding toolbar button:
This button is present by default on the Alternative set of toolbar commands of Atlantis.
A hot key can also be associated with the "Page break before" command through the "Tools | Hot Keys..." dialog:
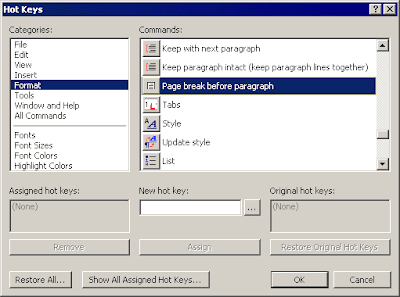
Assigning a hot key to the "Page break before" attribute will allow you to toggle it for the current paragraph with a single key press.
As you probably know, the "Heading 1" style is traditionally applied to the paragraphs heading all new chapters. Also each new chapter usually starts on a new page. So it would be nice if applying the "Heading 1" style to a paragraph automatically placed that paragraph at the top of a new page, making it the heading of the new chapter. This is done by associating the "Page break before" attribute with the "Heading 1" style. Here is how to:
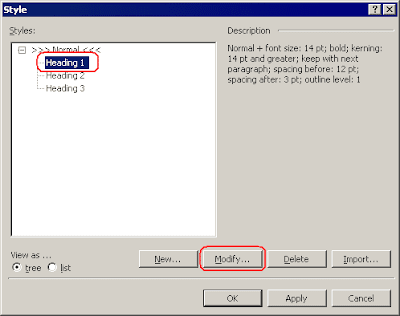
1) Run the "Format | Style..." menu command.
2) Select the "Heading 1" style, then press the "Modify..." button:
3) Click the "Paragraph..." button in the "Edit Style" dialog:
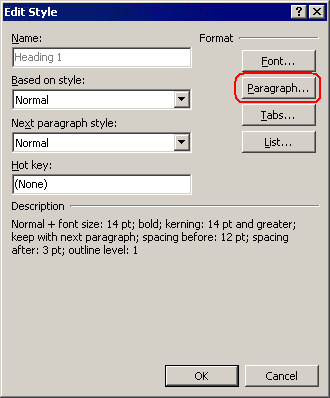
4) On the "Line & Page Breaks" tab of the "Paragraph Format" dialog, check the "Page break before" box, and OK out of all open dialogs.
Any paragraph associated with the "Heading 1" style will then automatically be formatted as set, and placed at the top of a new page.
Now what if you do not want to wait until the current page gets filled up? What if you want to start afresh on a new page at once? The solution that comes to mind straightaway to most people is: "I only need to press Ctrl+Enter". That's right: Ctrl+Enter inserts a so-called manual page break symbol (or simply page break) into documents at the current location. When the "View | Special Symbols" mode is enabled, a page break symbol looks in this way:

Whenever Atlantis encounters this symbol within the flow of a document text, it creates a new page in the document, and carries all further text over to that new page.
To many, this is the most obvious method to forcefully create new pages in a document. But in spite of its simplicity, this method should be avoided whenever possible, especially by inexperienced users.
This is because the page break symbol in reality belongs to the paragraph carried forward to the next page. The page break symbol and the paragraph body that follows on the next page are actually one single paragraph ending with a common "paragraph end mark" (the so-called "pilcrow" symbol). When you insert a page break into a document, you create a new paragraph which is automatically broken into two parts:

The beginning of the paragraph (highlighted in green above) is essentially the page break symbol itself and remains on the page it was inserted into. The rest of the paragraph (highlighted in blue above) is carried over to the next page even though it comes right after the page break symbol. In the above picture, the whole of the paragraph straddling two pages is marked with a red border.
So a "Page Break" symbol not only signals the end of the page it sits on, but it is also part and parcel of the paragraph carried forward to the next page.
When the "View | Special Symbols" mode is on, the paragraph end marks terminating all paragraphs are easily seen:

But when this same "View | Special Symbols" mode is off, the paragraph end marks are not showing. It is then often very difficult to detect that a paragraph beginning with a "Page Break" symbol actually straddles two pages:

This is why paragraphs containing "Page Break" symbols are often a source of problems in documents.
Let's take up the same example.
If we place the cursor right before the first character of our "Page Break paragraph" on page #2:

and apply the "Heading 1" style to this paragraph, it might look as if only the second part of the paragraph was affected by this change:

This is simply because the change in the formatting applied to the "Page Break" symbol does not show: as a symbol, its display is unchangeable. But even then, any paragraph formatting applied to a "Page Break paragraph" will affect both parts of it on either side of the interpage divide.
So the "Heading 1" style was actually applied to the part of our paragraph on page #2, but also to the part remaining on page #1. This is easily demonstrated if we click at the end of page #1 right before the "Page Break" symbol, then type new text. It will automatically be formatted with a larger font size and bold attribute, i.e. with the formatting associated with the corresponding paragraph, that of the "Heading 1" style:

So "Page Break symbol paragraphs" can be a source of various formatting problems.
But this is not all. When they are referenced in a table of contents, both parts of these "Page Break symbol paragraphs" automatically get included in the corresponding table items. Sometimes with unexpected and undesirable results.
These are only a few examples of the many problems that can be created by "Page Break symbol paragraphs". This is why it is preferable to avoid inserting these "Page Break" symbols in documents.
Now you might ask "how do I create page breaks safely then?"
Here is how:
1) Click within the paragraph to be placed on the new page after the page break.
2) Run the "Format | Paragraph..." menu command, or press the associated hot key Ctrl+Shift+G.
3) In the "Paragraph Format" dialog, click to show the "Line & Page Breaks" tab, check the "Page break before" box, and OK out of the dialog:

The target paragraph will automatically be carried forward to the top of a new page. If the "View | Special Symbols" mode is on, you will notice a special mark on the left of the first line of that paragraph:

This kind of mark indicates that the corresponding paragraph will always be placed at the top of the page it is located in.
Note that toggling the "Page break before" attribute for a paragraph can also be done with the corresponding toolbar button:

This button is present by default on the Alternative set of toolbar commands of Atlantis.
A hot key can also be associated with the "Page break before" command through the "Tools | Hot Keys..." dialog:

Assigning a hot key to the "Page break before" attribute will allow you to toggle it for the current paragraph with a single key press.
As you probably know, the "Heading 1" style is traditionally applied to the paragraphs heading all new chapters. Also each new chapter usually starts on a new page. So it would be nice if applying the "Heading 1" style to a paragraph automatically placed that paragraph at the top of a new page, making it the heading of the new chapter. This is done by associating the "Page break before" attribute with the "Heading 1" style. Here is how to:
1) Run the "Format | Style..." menu command.
2) Select the "Heading 1" style, then press the "Modify..." button:

3) Click the "Paragraph..." button in the "Edit Style" dialog:

4) On the "Line & Page Breaks" tab of the "Paragraph Format" dialog, check the "Page break before" box, and OK out of all open dialogs.
Any paragraph associated with the "Heading 1" style will then automatically be formatted as set, and placed at the top of a new page.
Thursday, April 1, 2010
Cleaning out document styles
In Atlantis, each document contains a specific style list. Each of the styles in that list can in turn be associated with specific paragraphs of the same document. The styles of a document can be adjusted through the "Format | Style..." dialog, or through the Styles panel of the Atlantis Control Board. You can change the formatting borne by the document styles, remove styles from the document, or add new styles.
Note that Atlantis might add new styles to a document when you paste fragments copied from other documents. This normally happens when you paste fragments associated in the source document with a style missing from the target document. This is done fully automatically and does not require intervention on your part.
Now at times you might make changes to a document and remove all the paragraphs associated with a given style, or simply reassociate them with a different style. This invariably leads to items becoming "orphaned" in the document style list, i.e. styles no longer associated with any paragraph in the document.
This does not mean at all that a document with "orphaned" styles is invalid in some way. You can have as many styles as you wish in your documents, even when most of them are not actually used within the document body. However, having a big amount of unused styles in a document style list might cause real inconveniences. Locating a style in such oversized lists is usually rather awkward.
Atlantis does not have a command to remove unused styles from documents. But there is still a way to locate and remove unused styles if keeping the document style lists as clean as possible is important to you. This method takes time but in some cases you'd be truly a lot better off removing the clutter of unused styles from a document.
Here is how to proceed:
1) First, make sure that the Atlantis Control Board is displaying (if necessary, press F6 or toggle "View | Control Board" on). Click the "Styles" button at the top of the Control Board to open up the Control Board Styles panel:

2) Click the "tree" button at the top of the Styles panel to display the document style list in a hierarchical way:

3) Now you need to revise all the styles reported by the Styles panel, starting from the bottommost style and working up to the topmost style (we'll explain further down why styles have to be revised in that order). So first click the bottommost style name in the Style panel (in the above screen capture, the "TOC Title" style).
4) At the bottom of the Styles panel, click "Select paragraphs associated with highlighted style" (rightmost button):

— If the highlighted style does have associated paragraphs in the document, these will immediately be selected in the document window. Take this as a signal that the style is in use and should not be removed. In this case, select the next style up in the Styles list, and click "Select paragraphs associated with highlighted style" again.
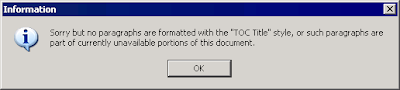
— If the highlighted style does not have associated paragraphs in the document, you will get the following message:
This time, you can click the "Delete style" button at the bottom of the Styles panel:

Note that the "Header" and "Footer" styles are a special case. If you want to check if a "Header" or "Footer" style is actually associated with paragraphs of the current document, you need to first activate the corresponding areas in the document window. This is done by clicking "View | Header & Footer" or double-clicking the grayed-out header or footer area. If you do not activate these header and footer areas before clicking "Select paragraphs associated with highlighted style" to check a "Header" or "Footer" style, you will get the same message from Atlantis, actually telling you that "such paragraphs are part of currently unavailable portions of the document". And you won't know if the document "Header" or "Footer" styles are or are not associated with paragraphs in the document. So always make sure that the header and footer areas are "active" before you check the "Header" or "Footer" styles. Of course, the "Header" or "Footer" styles should not be removed if you have headers or footers in your document.
When you have finished checking the "Header" or "Footer" styles, and want to check other styles, do not forget to display the document main body by clicking "View | Header & Footer" again or double-clicking the document main body area.
Now let's explain why document styles have to be revised in reverse order (from bottom to top).
Some styles might have no associated paragraphs in the document but still play an important role as a base for other styles. For example, you could have a style named "Comment" bearing the basic formatting of all comments in a document. This "Comment" style might have several child styles like the "Positive comment", "Critical comment", and "Neutral comment" styles. These would all be based on the "Comment" style, and would naturally inherit all the formatting defined for their parent style. But these child styles would of course have specific characteristics. The "Positive comment" style could bear a green font color in addition to the base formatting inherited from the "Comment" parent style. The "Critical comment" style could add red font color. Etc. You would use the "Positive comment", "Critical comment", and "Neutral comment" child styles to format comments in the document. The "Comment" style would not be used to format document paragraphs directly, but it would still play an important role as the defining base for the other "comment styles".
If you tried to remove such a parent "Comment" style through the Styles panel, you would get the following message:
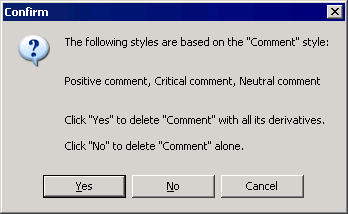
If you have not looked into the child styles associations yet, and don't know if paragraphs are associated with them, you won't be able to answer the "Yes/No" question in the above dialog safely. Removing the "Comment" style might affect any paragraphs associated with its child styles.
So you need to look into the child styles associations first before checking a parent style for its own associations with paragraphs. And since child styles are always displayed below the base style in the Styles panel,
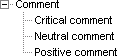
you need to revise styles from bottom to top. In this way, you make sure that you always revise child styles before the corresponding base styles, and know if these base styles are associated with paragraphs in the document.
Accordingly, you should never remove a base style if you have previously found out that its child (or derived) styles do have associated paragraphs in the document. It would be like sawing off the branch these child styles are hanging on to! :)
Note that Atlantis might add new styles to a document when you paste fragments copied from other documents. This normally happens when you paste fragments associated in the source document with a style missing from the target document. This is done fully automatically and does not require intervention on your part.
Now at times you might make changes to a document and remove all the paragraphs associated with a given style, or simply reassociate them with a different style. This invariably leads to items becoming "orphaned" in the document style list, i.e. styles no longer associated with any paragraph in the document.
This does not mean at all that a document with "orphaned" styles is invalid in some way. You can have as many styles as you wish in your documents, even when most of them are not actually used within the document body. However, having a big amount of unused styles in a document style list might cause real inconveniences. Locating a style in such oversized lists is usually rather awkward.
Atlantis does not have a command to remove unused styles from documents. But there is still a way to locate and remove unused styles if keeping the document style lists as clean as possible is important to you. This method takes time but in some cases you'd be truly a lot better off removing the clutter of unused styles from a document.
Here is how to proceed:
1) First, make sure that the Atlantis Control Board is displaying (if necessary, press F6 or toggle "View | Control Board" on). Click the "Styles" button at the top of the Control Board to open up the Control Board Styles panel:

2) Click the "tree" button at the top of the Styles panel to display the document style list in a hierarchical way:

3) Now you need to revise all the styles reported by the Styles panel, starting from the bottommost style and working up to the topmost style (we'll explain further down why styles have to be revised in that order). So first click the bottommost style name in the Style panel (in the above screen capture, the "TOC Title" style).
4) At the bottom of the Styles panel, click "Select paragraphs associated with highlighted style" (rightmost button):

— If the highlighted style does have associated paragraphs in the document, these will immediately be selected in the document window. Take this as a signal that the style is in use and should not be removed. In this case, select the next style up in the Styles list, and click "Select paragraphs associated with highlighted style" again.
— If the highlighted style does not have associated paragraphs in the document, you will get the following message:

This time, you can click the "Delete style" button at the bottom of the Styles panel:

Note that the "Header" and "Footer" styles are a special case. If you want to check if a "Header" or "Footer" style is actually associated with paragraphs of the current document, you need to first activate the corresponding areas in the document window. This is done by clicking "View | Header & Footer" or double-clicking the grayed-out header or footer area. If you do not activate these header and footer areas before clicking "Select paragraphs associated with highlighted style" to check a "Header" or "Footer" style, you will get the same message from Atlantis, actually telling you that "such paragraphs are part of currently unavailable portions of the document". And you won't know if the document "Header" or "Footer" styles are or are not associated with paragraphs in the document. So always make sure that the header and footer areas are "active" before you check the "Header" or "Footer" styles. Of course, the "Header" or "Footer" styles should not be removed if you have headers or footers in your document.
When you have finished checking the "Header" or "Footer" styles, and want to check other styles, do not forget to display the document main body by clicking "View | Header & Footer" again or double-clicking the document main body area.
Now let's explain why document styles have to be revised in reverse order (from bottom to top).
Some styles might have no associated paragraphs in the document but still play an important role as a base for other styles. For example, you could have a style named "Comment" bearing the basic formatting of all comments in a document. This "Comment" style might have several child styles like the "Positive comment", "Critical comment", and "Neutral comment" styles. These would all be based on the "Comment" style, and would naturally inherit all the formatting defined for their parent style. But these child styles would of course have specific characteristics. The "Positive comment" style could bear a green font color in addition to the base formatting inherited from the "Comment" parent style. The "Critical comment" style could add red font color. Etc. You would use the "Positive comment", "Critical comment", and "Neutral comment" child styles to format comments in the document. The "Comment" style would not be used to format document paragraphs directly, but it would still play an important role as the defining base for the other "comment styles".
If you tried to remove such a parent "Comment" style through the Styles panel, you would get the following message:

If you have not looked into the child styles associations yet, and don't know if paragraphs are associated with them, you won't be able to answer the "Yes/No" question in the above dialog safely. Removing the "Comment" style might affect any paragraphs associated with its child styles.
So you need to look into the child styles associations first before checking a parent style for its own associations with paragraphs. And since child styles are always displayed below the base style in the Styles panel,

you need to revise styles from bottom to top. In this way, you make sure that you always revise child styles before the corresponding base styles, and know if these base styles are associated with paragraphs in the document.
Accordingly, you should never remove a base style if you have previously found out that its child (or derived) styles do have associated paragraphs in the document. It would be like sawing off the branch these child styles are hanging on to! :)
Subscribe to:
Posts (Atom)