Atlantis 1.6.4.3 was under betatesting for a month. And now this version of Atlantis is available as a public release.
You can find the complete list of new features and changes in this version of Atlantis by clicking here.
As always, there are multiple ways to upgrade your copy of Atlantis Word Processor to the latest version.
Monday, November 30, 2009
Friday, November 27, 2009
Keep those hands on the keyboard (3): Fast dialoguing
From time to time Atlantis pops up various windows that will not go away until you "talk" to them. You have to reply to the questions asked in these windows, choose some options, etc. These windows are called modal dialogs, or simply dialogs.
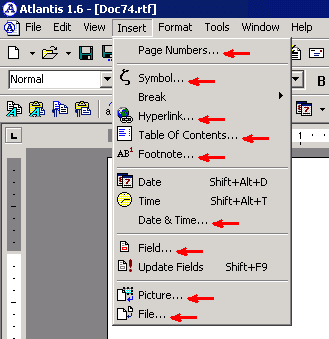
Many menu commands of Atlantis display dialogs when they are activated. You can easily tell when a menu command will open a dialog: its menu caption ends with an ellipsis (3 dots). For example, this is the case with most commands in the "Insert" menu:
A typical dialog has "OK" and "Cancel" buttons in the right bottom corner, plus a cross button on the title bar:
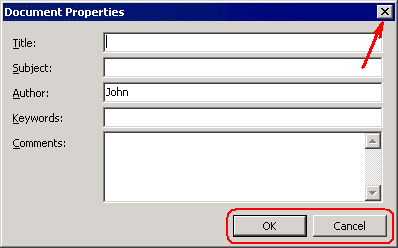
Clicking the "OK" button registers the changes that you have made in the dialog. The "Cancel" button obviously discards any changes. Clicking the cross button is equivalent to pressing the "Cancel" button.
Of course, any of these three buttons can be clicked with the mouse. But you can also "click" them from the keyboard.
Let's start with the "OK" button. It initially displays with a thicker border:

This means that the "OK" button is the "default button" of this dialog. A "default button" can be "clicked" by pressing the Enter key. So when you need to click the "OK" button in a dialog, you can simply press Enter. Note that this works only when the "OK" button has a special thicker border around it.
"Clicking" the "Cancel" button from the keyboard is also extremely easy. You only have to press the Esc key to close the dialog and cancel all the changes made in it.
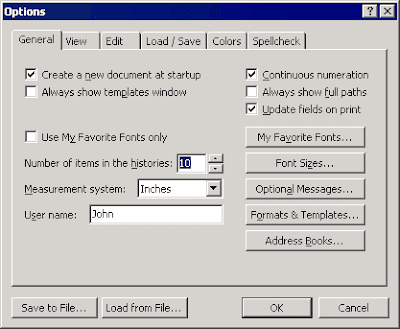
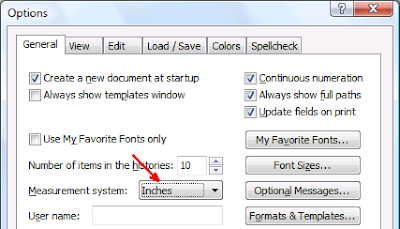
Now here are more ways you can communicate with dialogs through the keyboard. Let's take the "Tools | Options..." dialog as an example:
* When a dialog has multiple tabs, as the "Tools | Options..." dialog:
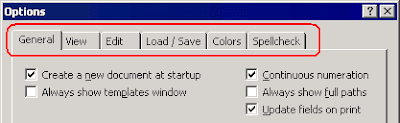
switching over to the next tab is done by pressing Ctrl+Tab. And again repeatedly until you reach the appropriate tab.
* In most cases, one of the controls (GUI elements) of a dialog is focused (ie has the input focus). This means that you can interact with the focused element through the keyboard.
How do you find out which of the dialog elements is focused?
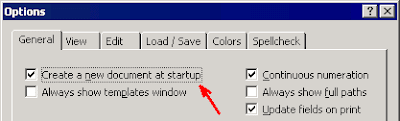
Focused buttons have a dotted rectangle around them:
And so have check or "tick" boxes:
When a button is focused, you can press the Space bar or the Enter key to run the corresponding command.
When a checkbox is focused, pressing the Space bar checks or unchecks the box, and hence activates or inactivates the corresponding option.
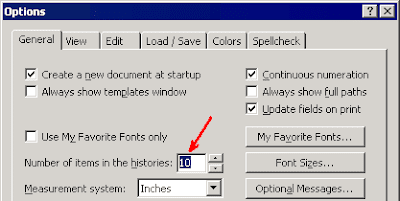
Text edit boxes can also be focused. In the absence of a selection, focused edit boxes display a blinking caret:

and any selection with a special color:
So whenever an edit box is focused, the text in it behaves pretty much like any editable text in the document window.
You can use the arrow keys to select its text or just move the blinking caret within the box.
You can press Ctrl+C to copy the edit box selection to the clipboard, or Ctrl+V to paste the clipboard text into the edit box.
You can press Del or the Backspace key to remove any selection within the edit box.
In the absence of a selection, the Backspace key allows you to erase one character at a time, going backwards.
And obviously, you can also type text directly into the focused edit box.
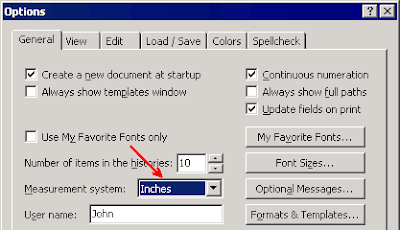
Focused boxes with attached drop-down lists display with a special background color:
or with a dotted rectangle:
When such a drop-down box is focused, you can use the arrow keys to cycle through the list items. You can also press Alt+Down Arrow to display the whole drop down list, and again cycle through the list items with the arrow keys:

When focused, ordinary list boxes display a dotted rectangle around the selected item:
When such a list box is focused, you can also use the arrow keys to cycle through the list items.
* Dialog elements become focused when you click them with the mouse. But you can also press the Tab key to switch focus from one dialog element to another. Pressing the Tab key repeatedly takes you from one element to the next until the desired element becomes focused.
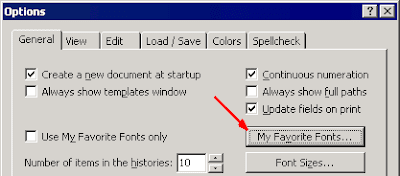
* Most dialog elements have associated keyboard accelerators. If you press the Alt key in any dialog of Atlantis, you will notice underlined letters within most captions:

If you maintain the Alt key down and press the corresponding letter keys, you will "click" the corresponding element of a dialog. In other words, you will either
For example, pressing Alt+Z when the above dialog is showing is the same as clicking its "Font Sizes..." button.
Many menu commands of Atlantis display dialogs when they are activated. You can easily tell when a menu command will open a dialog: its menu caption ends with an ellipsis (3 dots). For example, this is the case with most commands in the "Insert" menu:

A typical dialog has "OK" and "Cancel" buttons in the right bottom corner, plus a cross button on the title bar:

Clicking the "OK" button registers the changes that you have made in the dialog. The "Cancel" button obviously discards any changes. Clicking the cross button is equivalent to pressing the "Cancel" button.
Of course, any of these three buttons can be clicked with the mouse. But you can also "click" them from the keyboard.
Let's start with the "OK" button. It initially displays with a thicker border:

This means that the "OK" button is the "default button" of this dialog. A "default button" can be "clicked" by pressing the Enter key. So when you need to click the "OK" button in a dialog, you can simply press Enter. Note that this works only when the "OK" button has a special thicker border around it.
"Clicking" the "Cancel" button from the keyboard is also extremely easy. You only have to press the Esc key to close the dialog and cancel all the changes made in it.
Now here are more ways you can communicate with dialogs through the keyboard. Let's take the "Tools | Options..." dialog as an example:

* When a dialog has multiple tabs, as the "Tools | Options..." dialog:

switching over to the next tab is done by pressing Ctrl+Tab. And again repeatedly until you reach the appropriate tab.
* In most cases, one of the controls (GUI elements) of a dialog is focused (ie has the input focus). This means that you can interact with the focused element through the keyboard.
How do you find out which of the dialog elements is focused?
Focused buttons have a dotted rectangle around them:

And so have check or "tick" boxes:

When a button is focused, you can press the Space bar or the Enter key to run the corresponding command.
When a checkbox is focused, pressing the Space bar checks or unchecks the box, and hence activates or inactivates the corresponding option.
Text edit boxes can also be focused. In the absence of a selection, focused edit boxes display a blinking caret:

and any selection with a special color:

So whenever an edit box is focused, the text in it behaves pretty much like any editable text in the document window.
You can use the arrow keys to select its text or just move the blinking caret within the box.
You can press Ctrl+C to copy the edit box selection to the clipboard, or Ctrl+V to paste the clipboard text into the edit box.
You can press Del or the Backspace key to remove any selection within the edit box.
In the absence of a selection, the Backspace key allows you to erase one character at a time, going backwards.
And obviously, you can also type text directly into the focused edit box.
Focused boxes with attached drop-down lists display with a special background color:

or with a dotted rectangle:

When such a drop-down box is focused, you can use the arrow keys to cycle through the list items. You can also press Alt+Down Arrow to display the whole drop down list, and again cycle through the list items with the arrow keys:

When focused, ordinary list boxes display a dotted rectangle around the selected item:

When such a list box is focused, you can also use the arrow keys to cycle through the list items.
* Dialog elements become focused when you click them with the mouse. But you can also press the Tab key to switch focus from one dialog element to another. Pressing the Tab key repeatedly takes you from one element to the next until the desired element becomes focused.
* Most dialog elements have associated keyboard accelerators. If you press the Alt key in any dialog of Atlantis, you will notice underlined letters within most captions:

If you maintain the Alt key down and press the corresponding letter keys, you will "click" the corresponding element of a dialog. In other words, you will either
- focus the related list,
- check or uncheck the associated option,
- or actually press the target button.
For example, pressing Alt+Z when the above dialog is showing is the same as clicking its "Font Sizes..." button.
Wednesday, November 25, 2009
Keep those hands on the keyboard (2): Zoom, spellcheck, and switch back
Using keyboard instead of mouse can be a productivity booster for any writer. Here are more keyboard tips concerning Atlantis.
* Predefined zooming types and factors have dedicated hot keys:
The zooming factor can be modified incrementally by 10%.
Ctrl+Shift+Alt+Up Arrow increases the zooming factor by 10%.
Zooming in is also achieved by pressing the Ctrl key in combination with the Plus key (on the numeric pad).
Ctrl+Shift+Alt+Down Arrow decreases the zooming factor by 10%.
Zooming out is also achieved by pressing the Ctrl key in combination with the Minus key (on the numeric pad).
* When we encounter a misspelt red-underlined word in a document, most of us usually grab the mouse and right-click the word for a list of suggestions from the spellchecker:
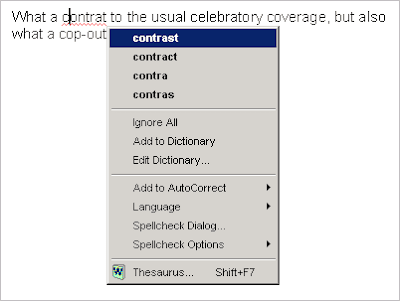
If one of the suggestions is appropriate, a click on it fixes the misspelling.
However, you might find it quite inconvenient to have to turn to the mouse each time you want to have a look at the list of spelling suggestions. No problem! You can display the spellchecker suggestions from the keyboard. Just place the insertion cursor within the misspelt word (or immediately after its last letter), and press the Menu key on your keyboard to display the spellchecker suggestions for the currently red-underlined word.
The Menu key looks like this:

* When we are working on a document, we quite often need to navigate from one location to another, and back within the same document. This happens for example when we want to paste a copy of a text fragment located further down in the document. In such cases we usually scroll the document window down till we reach our target, select the text to copy, send it to the Windows clipboard with Ctrl+C, and finally scroll back up to the original location, where we can paste the copied text with Ctrl+V.
Undoubtedly, the whole rigmarole is quite tedious and cumbersome, especially when the document is very long. This is why Atlantis has the F5 hot key to take you back to the place where you last made a change to the current document. So after you’ve placed the selection of text on the Windows clipboard, all you need to do to go back to your starting point is to press the F5 key. Voilà!
More keyboard tips still to follow soon...
* Predefined zooming types and factors have dedicated hot keys:
- Ctrl+Shift+K,P activates the "Page width" display.
- Ctrl+Shift+K,T triggers the "Text width" zoom.
- Ctrl+Shift+K,1 and Ctrl+Shift+K,2 respectively enable the "Whole pages" and "Two pages" zoom types.
- The standard 100% zooming factor also has a dedicated hot key: Ctrl+Shift+K,0.
The zooming factor can be modified incrementally by 10%.
Ctrl+Shift+Alt+Up Arrow increases the zooming factor by 10%.
Zooming in is also achieved by pressing the Ctrl key in combination with the Plus key (on the numeric pad).
Ctrl+Shift+Alt+Down Arrow decreases the zooming factor by 10%.
Zooming out is also achieved by pressing the Ctrl key in combination with the Minus key (on the numeric pad).
* When we encounter a misspelt red-underlined word in a document, most of us usually grab the mouse and right-click the word for a list of suggestions from the spellchecker:

If one of the suggestions is appropriate, a click on it fixes the misspelling.
However, you might find it quite inconvenient to have to turn to the mouse each time you want to have a look at the list of spelling suggestions. No problem! You can display the spellchecker suggestions from the keyboard. Just place the insertion cursor within the misspelt word (or immediately after its last letter), and press the Menu key on your keyboard to display the spellchecker suggestions for the currently red-underlined word.
The Menu key looks like this:

* When we are working on a document, we quite often need to navigate from one location to another, and back within the same document. This happens for example when we want to paste a copy of a text fragment located further down in the document. In such cases we usually scroll the document window down till we reach our target, select the text to copy, send it to the Windows clipboard with Ctrl+C, and finally scroll back up to the original location, where we can paste the copied text with Ctrl+V.
Undoubtedly, the whole rigmarole is quite tedious and cumbersome, especially when the document is very long. This is why Atlantis has the F5 hot key to take you back to the place where you last made a change to the current document. So after you’ve placed the selection of text on the Windows clipboard, all you need to do to go back to your starting point is to press the F5 key. Voilà!
More keyboard tips still to follow soon...
Saturday, November 21, 2009
Keep those hands on the keyboard: You're not old hat, – you're smart!
In the MS-DOS era, not every PC was equipped with a mouse, and users interacted with applications mainly through the keyboard. But nowadays it is hard to imagine a modern PC without mouse input. Most operations can be done through the mouse, and some – exclusively through the mouse.
So why bother memorizing keyboard shortcuts if the mouse is so convenient? Simply because every time you take your hands off the keyboard, you slow yourself down! Keep those hands on the keyboard and off of your mouse. It is faster that way!
Plenty can be done in Atlantis from the keyboard only, including the press of a button or the selection of a menu item.
You can assign shortcuts
so that you can launch actions, apply style to paragraphs, insert special symbols directly from the keyboard.
Now here are less obvious ways to perform familiar actions through the keyboard.
* Of course, you can click a button on the Atlantis document bar to switch to another document. But the same can be achieved by pressing any Alt+N combination, N being the number assigned to the document on the bar. Alt+1 switches to the first open document (leftmost button), Alt+2 switches to the second open document (next button), and so on. Pressing Alt+0 (zero on the main keyboard) shows the complete list of all open documents. The arrow keys select the target document, the Enter key brings the document up.
Cycling through the open documents can also be done by pressing Ctrl+Tab.
* The Atlantis toolbars include 3 boxes to apply Style, Font, and Font size to text:
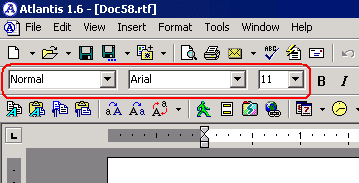
Each of these boxes can be accessed from the keyboard.
Ctrl+Shift+F brings up the Font box:
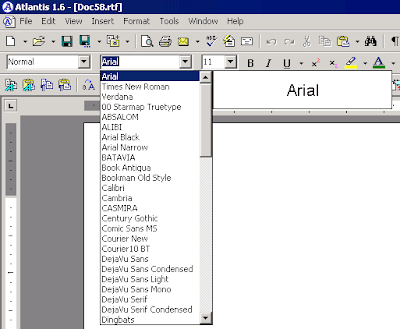
You can type the required font name in, then press Enter. Or use the arrow keys to select a font name in the list, then press Enter. The font will immediately be applied to the current text in the document window.
Similarly, the Font size box opens with Ctrl+Shift+P. You can type the required font size in, then press Enter. Or use the arrow keys to select a font size from the list, then press Enter. The font size will immediately be applied to the current text in the document window.
Same thing with the Styles box. Ctrl+Shift+S opens the drop-down. You can type the required style name in, then press Enter. Or use the arrow keys to select a style from the list, then press Enter. The style will immediately be applied to the current text in the document window.
* To access any menu command of Atlantis, you only need to remember the simplest of shortcuts: the Alt key.
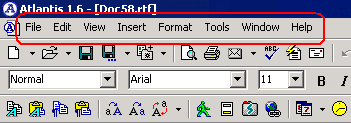
Normally the main menu of Atlantis looks in this way:
But if you press the Alt key (or its counterpart from the MS DOS age – F10), some of the menu caption letters will be underlined:

When these underlined letters are displayed, Atlantis is in the menu mode: you can use the keyboard to navigate among menu commands, and invoke them.
Actually, there are two ways to navigate among the menu commands with the keyboard.
First, you can use the arrows keys.
Second, you can type any one of the underlined letters to activate the associated menu item. For example, a press on the F key opens the File menu:
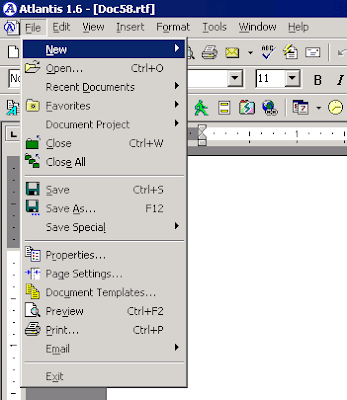
Pressing any letter underlined in one of the File menu items invokes the corresponding dialog. For example, the Print... command is executed by typing the letter P.
This is why these underlined letters are sometimes called "accelerator keys".
Atlantis allows you to customize which character should be underlined in its menu captions and act as its accelerator keys. This is done in the Tools | Menus... dialog with a press of the Rename... button:
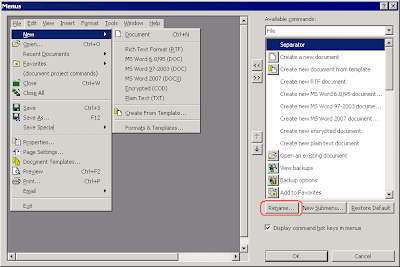
You will notice that most menu names display an additional ampersand character:
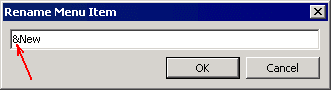
This ampersand character is not actually displayed in the Atlantis GUI. It simply means that the letter next to it will be underlined in the corresponding menu caption, and will act as its accelerator key. In the above example, the ampersand only indicates that the "N" letter will be underlined and will act as the accelerator key to the New command of the File menu.
So you can assign any suitable accelerator key to a menu item in this way: simply rename the menu item and place an ampersand character before the letter that you want to act as its accelerator key.
... More "keyboard vs mouse" tips to follow soon.
So why bother memorizing keyboard shortcuts if the mouse is so convenient? Simply because every time you take your hands off the keyboard, you slow yourself down! Keep those hands on the keyboard and off of your mouse. It is faster that way!
Plenty can be done in Atlantis from the keyboard only, including the press of a button or the selection of a menu item.
You can assign shortcuts
- to nearly any Atlantis command using the "Tools | Hot Keys..." dialog,
- to paragraph styles from the "Format | Style..." window,
- to special symbols in the "Insert | Symbol..." panel
so that you can launch actions, apply style to paragraphs, insert special symbols directly from the keyboard.
Now here are less obvious ways to perform familiar actions through the keyboard.
* Of course, you can click a button on the Atlantis document bar to switch to another document. But the same can be achieved by pressing any Alt+N combination, N being the number assigned to the document on the bar. Alt+1 switches to the first open document (leftmost button), Alt+2 switches to the second open document (next button), and so on. Pressing Alt+0 (zero on the main keyboard) shows the complete list of all open documents. The arrow keys select the target document, the Enter key brings the document up.
Cycling through the open documents can also be done by pressing Ctrl+Tab.
* The Atlantis toolbars include 3 boxes to apply Style, Font, and Font size to text:

Each of these boxes can be accessed from the keyboard.
Ctrl+Shift+F brings up the Font box:

You can type the required font name in, then press Enter. Or use the arrow keys to select a font name in the list, then press Enter. The font will immediately be applied to the current text in the document window.
Similarly, the Font size box opens with Ctrl+Shift+P. You can type the required font size in, then press Enter. Or use the arrow keys to select a font size from the list, then press Enter. The font size will immediately be applied to the current text in the document window.
Same thing with the Styles box. Ctrl+Shift+S opens the drop-down. You can type the required style name in, then press Enter. Or use the arrow keys to select a style from the list, then press Enter. The style will immediately be applied to the current text in the document window.
* To access any menu command of Atlantis, you only need to remember the simplest of shortcuts: the Alt key.
Normally the main menu of Atlantis looks in this way:

But if you press the Alt key (or its counterpart from the MS DOS age – F10), some of the menu caption letters will be underlined:

When these underlined letters are displayed, Atlantis is in the menu mode: you can use the keyboard to navigate among menu commands, and invoke them.
Actually, there are two ways to navigate among the menu commands with the keyboard.
First, you can use the arrows keys.
Second, you can type any one of the underlined letters to activate the associated menu item. For example, a press on the F key opens the File menu:

Pressing any letter underlined in one of the File menu items invokes the corresponding dialog. For example, the Print... command is executed by typing the letter P.
This is why these underlined letters are sometimes called "accelerator keys".
Atlantis allows you to customize which character should be underlined in its menu captions and act as its accelerator keys. This is done in the Tools | Menus... dialog with a press of the Rename... button:

You will notice that most menu names display an additional ampersand character:

This ampersand character is not actually displayed in the Atlantis GUI. It simply means that the letter next to it will be underlined in the corresponding menu caption, and will act as its accelerator key. In the above example, the ampersand only indicates that the "N" letter will be underlined and will act as the accelerator key to the New command of the File menu.
So you can assign any suitable accelerator key to a menu item in this way: simply rename the menu item and place an ampersand character before the letter that you want to act as its accelerator key.
... More "keyboard vs mouse" tips to follow soon.
Wednesday, November 18, 2009
Open dashes vs Closed dashes
It is hard to find another punctuation mark in English language that has so many different uses and fuels so many debates among writers and philologists as dashes. So we are not going to start a discussion on the use of dashes. So much has already been said it would be hard to add anything new. If you are interested, Wikipedia has plenty of detailed information on the use of dashes.
But we still have information relevant to Atlantis. The new minor version of Atlantis Word Processor (– 1.6.4.3 –) currently under betatesting introduces a change in the way Atlantis handles dashes.
As you most probably know, Atlantis has two special symbols called "Short dash" (or "En dash") and "Long dash" (or "Em Dash"). They can be inserted using the "Insert | Symbol..." dialog:
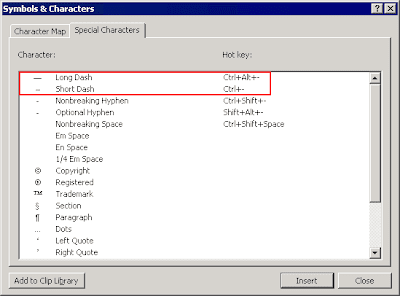
or by pressing the associated hot keys: Ctrl+Alt+– and Ctrl+-.
These dashes can also be inserted in your documents by AutoCorrect. For example, AutoCorrect will by default replace two hyphens (--) with an En dash on-the-fly, – as you type them.
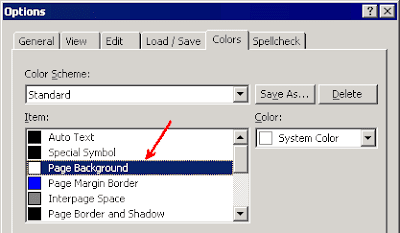
As you know, Atlantis systematically adds missing spaces, or removes spare spaces before/after most punctuation signs according to the standard rules. But Atlantis also allows you to change these rules to suit your own preferences. When you press the "Rules..." button in the "Tools | AutoCorrect Options..." dialog:
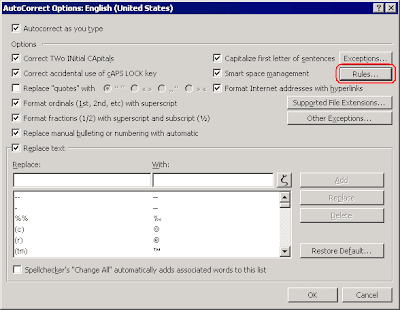
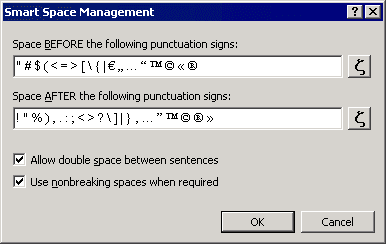
the "Smart Space Management" window is displayed where you can customize which punctuation signs require space before or after:
Now about dashes. They can be either "open" or "closed".
"Open" dashes have space characters around them, like this:
"Closed" dashes do not have spaces before and after them:
"Open" dashes was always the default option in Atlantis. By this we mean that Atlantis systematically added space characters around dashes if it found them missing. And the "Smart Space Management" dialog did not allow end-users to change this behavior and control spacing around dashes. In other words, "closed" dashes were not accepted by Atlantis. This has been corrected in the upcoming version. In Atlantis 1.6.4.3, you will be able to specify "closed" dashes as an accepted behavior by Atlantis. "Open" dashes will still be the default option on install. But you'll be able to remove dashes from the list of punctuation signs requiring space before and after if it suits you better. Simply select the dashes in the "Smart Space Management" window:

and press Del. After that, Atlantis won't attempt to add spaces around dashes if you don't type them in yourself.
As always, this latest beta version of Atlantis Word Processor is available from the Betatesting page.
But we still have information relevant to Atlantis. The new minor version of Atlantis Word Processor (– 1.6.4.3 –) currently under betatesting introduces a change in the way Atlantis handles dashes.
As you most probably know, Atlantis has two special symbols called "Short dash" (or "En dash") and "Long dash" (or "Em Dash"). They can be inserted using the "Insert | Symbol..." dialog:

or by pressing the associated hot keys: Ctrl+Alt+– and Ctrl+-.
These dashes can also be inserted in your documents by AutoCorrect. For example, AutoCorrect will by default replace two hyphens (--) with an En dash on-the-fly, – as you type them.
As you know, Atlantis systematically adds missing spaces, or removes spare spaces before/after most punctuation signs according to the standard rules. But Atlantis also allows you to change these rules to suit your own preferences. When you press the "Rules..." button in the "Tools | AutoCorrect Options..." dialog:

the "Smart Space Management" window is displayed where you can customize which punctuation signs require space before or after:

Now about dashes. They can be either "open" or "closed".
"Open" dashes have space characters around them, like this:
He was quick to declare victory — maybe too quick.
"Closed" dashes do not have spaces before and after them:
He was quick to declare victory—maybe too quick.
"Open" dashes was always the default option in Atlantis. By this we mean that Atlantis systematically added space characters around dashes if it found them missing. And the "Smart Space Management" dialog did not allow end-users to change this behavior and control spacing around dashes. In other words, "closed" dashes were not accepted by Atlantis. This has been corrected in the upcoming version. In Atlantis 1.6.4.3, you will be able to specify "closed" dashes as an accepted behavior by Atlantis. "Open" dashes will still be the default option on install. But you'll be able to remove dashes from the list of punctuation signs requiring space before and after if it suits you better. Simply select the dashes in the "Smart Space Management" window:

and press Del. After that, Atlantis won't attempt to add spaces around dashes if you don't type them in yourself.
As always, this latest beta version of Atlantis Word Processor is available from the Betatesting page.
Friday, November 13, 2009
Optimizing PNG images
You might say "Who cares about file size nowadays? Modern PCs have hard disks with zillions of bytes of capacity. Why bother with file size optimization?"
It is true that modern hard disks have a much larger capacity than, let's say, 15 years ago when a 1 GB hard disk was considered a luxury. Today even USB flash drives have a larger capacity. But there are cases when file size really matters.
It might be the case if you run a Web site. In most cases, you've subscribed to only a limited monthly bandwidth. Now if your site has only a few visitors a day, probably your bandwidth limit is irrelevant. It will hardly be ever exceeded. But if your site has hundreds or thousands of visitors a day, the weight of your files might be critical. Let's suppose that your site harbors a 1 MB picture. If it gets viewed 100 times, this will add 100 MB to the traffic of your site. 1,000 views will generate an extra gigabyte of traffic. What if it gets viewed 10,000 or even more times? It isn't hard to imagine how many gigabytes of your allowed bandwidth will be eaten up. This is why optimizing graphic files saves site traffic. This in turn might allow you to switch to a cheaper Web hosting plan and save you money. Optimized pictures will also load faster in your visitors' Web browsers, and browsing your site will be all the more pleasant.
Having optimized graphic files in the eBooks or documents you create might also be important to spare download time to readers.
Now how can you optimize picture size?
Pictures already included in documents can be optimized in Atlantis by reducing their quality. But graphic files can also be optimized directly on your hard disk using OptiPNG by Cosmin Truţa. This free utility shrinks PNG image files (PNG being one of the most popular image formats among Web site designers). OptiPNG performs lossless optimization of PNG files, plus it can convert images in other formats (BMP, GIF, etc) to optimized PNG.
OptiPNG is a command-line (console) application for Windows. You can download it directly from its home site:
http://optipng.sourceforge.net/
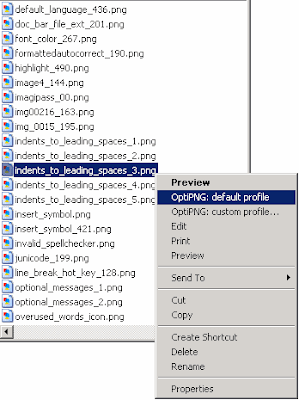
But there is a more convenient way to use this utility. A special setup file of OptiPNG created by Dmitry Vlasko not only installs OptiPNG on your system, but also integrates it into the Windows shell. Pictures can then be optimized directly in Windows Explorer by right-clicking their filenames. You'll find this setup file at the OptiPNG Windows shell integration home page.
Here are full instructions on how to install and use this utility:
Click the following link to download the SetupOptiPNG.rar compressed file:
http://dms-journal.ho.ua/storage/software/OptiPNG/SetupOptiPNG.rar
Then extract SetupOptiPNG.msi from SetupOptiPNG.rar, run it, and follow the onscreen instructions.
To adjust the OptiPNG settings, use the "Start > Programs > OptiPNG Settings" shortcut.
To optimize any PNG image on your hard disk, right-click it in Windows Explorer, and choose the "OptiPNG: default profile" menu command:
What could be more convenient?
It is true that modern hard disks have a much larger capacity than, let's say, 15 years ago when a 1 GB hard disk was considered a luxury. Today even USB flash drives have a larger capacity. But there are cases when file size really matters.
It might be the case if you run a Web site. In most cases, you've subscribed to only a limited monthly bandwidth. Now if your site has only a few visitors a day, probably your bandwidth limit is irrelevant. It will hardly be ever exceeded. But if your site has hundreds or thousands of visitors a day, the weight of your files might be critical. Let's suppose that your site harbors a 1 MB picture. If it gets viewed 100 times, this will add 100 MB to the traffic of your site. 1,000 views will generate an extra gigabyte of traffic. What if it gets viewed 10,000 or even more times? It isn't hard to imagine how many gigabytes of your allowed bandwidth will be eaten up. This is why optimizing graphic files saves site traffic. This in turn might allow you to switch to a cheaper Web hosting plan and save you money. Optimized pictures will also load faster in your visitors' Web browsers, and browsing your site will be all the more pleasant.
Having optimized graphic files in the eBooks or documents you create might also be important to spare download time to readers.
Now how can you optimize picture size?
Pictures already included in documents can be optimized in Atlantis by reducing their quality. But graphic files can also be optimized directly on your hard disk using OptiPNG by Cosmin Truţa. This free utility shrinks PNG image files (PNG being one of the most popular image formats among Web site designers). OptiPNG performs lossless optimization of PNG files, plus it can convert images in other formats (BMP, GIF, etc) to optimized PNG.
OptiPNG is a command-line (console) application for Windows. You can download it directly from its home site:
http://optipng.sourceforge.net/
But there is a more convenient way to use this utility. A special setup file of OptiPNG created by Dmitry Vlasko not only installs OptiPNG on your system, but also integrates it into the Windows shell. Pictures can then be optimized directly in Windows Explorer by right-clicking their filenames. You'll find this setup file at the OptiPNG Windows shell integration home page.
Here are full instructions on how to install and use this utility:
Click the following link to download the SetupOptiPNG.rar compressed file:
http://dms-journal.ho.ua/storage/software/OptiPNG/SetupOptiPNG.rar
Then extract SetupOptiPNG.msi from SetupOptiPNG.rar, run it, and follow the onscreen instructions.
To adjust the OptiPNG settings, use the "Start > Programs > OptiPNG Settings" shortcut.
To optimize any PNG image on your hard disk, right-click it in Windows Explorer, and choose the "OptiPNG: default profile" menu command:

What could be more convenient?
Monday, November 9, 2009
What's under the hood: Supercompact RTFs
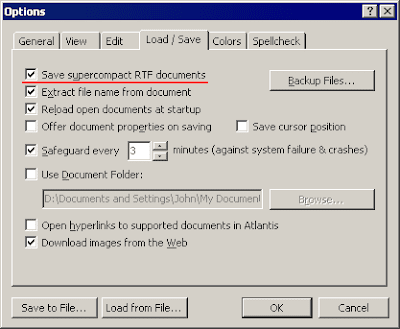
Have you ever wondered what are those "supercompact RTFs" enabled by default in the "Tools | Options..." window of Atlantis?
Are there two flavors of the RTF format?
Not actually. There is a single Rich Text Format standard from Microsoft. But RTF files can be generated differently.
To begin with, any RTF document generated by Atlantis, is a valid RTF file compliant with the RTF specification. But this specification allows some document elements to be saved in multiple different but still valid ways. Atlantis simply exploits the possibilities offered by the RTF specification to generate smaller RTF files.
You might wonder why then offer to save "non-supercompact" RTFs if "supercompact" RTFs are always smaller than their "traditional" counterparts? The answer is very simple: not every word processing application supports all the features of the RTF specification. Consequently not every software can display supercompact RTFs correctly. Luckily, this mainly applies to older word processors. All major modern word processors (including MS Word and OpenOffice) display the supercompact RTFs of Atlantis as intended. So you might need to uncheck the "Save supercompact RTF documents" option in Atlantis only if you are going to send your RTF documents to someone whose word processor cannot display supercompact RTFs correctly.
OK, then what's exactly the difference between "supercompact RTFs" and "non-supercompact RTFs"? If you need technical details, here they are:
1) A paragraph in traditional RTFs is normally terminated by a sequence of 6 characters (bytes):
"<carriage_return><line_feed>" (or CR/LF - two bytes with codes 13 and 10) is a standard combination terminating any line in most plain text files in Windows.
A paragraph in supercompact RTFs is terminated by 2 characters (bytes) only:
You save 4 bytes per paragraph if you save the document as supercompact.
2) Most non-English characters in traditional RTFs are stored in a 4-byte format:
<NN> is a two-byte character code in hexadecimal format.
In supercompact RTFs, such characters are normally saved as a single byte containing the ANSI code of a character.
For example, the "é" letter (e-acute) is saved to traditional RTFs as
This "é" letter is stored within supercompact RTFs as a single byte with code 233.
So, you save 3 bytes per a non-English character if you save as supercompact.
3) Finally, a difference which makes supercompact files really a useful option.
Pictures are always stored in traditional RTFs as Windows metafiles.
In supercompact RTFs, pictures are stored as PNGs or JPEGs.
In most cases, metafiles are much bigger than their counterparts in the PNG or JPEG format. Have I said "much bigger"? I actually wanted to say "MUCH-MUCH bigger". A tenfold difference in size between the metafile and PNG versions of the same picture is a completely normal thing.
So if your RTF document contains pictures, you can DRAMATICALLY shrink its file size by saving as supercompact RTF.

Are there two flavors of the RTF format?
Not actually. There is a single Rich Text Format standard from Microsoft. But RTF files can be generated differently.
To begin with, any RTF document generated by Atlantis, is a valid RTF file compliant with the RTF specification. But this specification allows some document elements to be saved in multiple different but still valid ways. Atlantis simply exploits the possibilities offered by the RTF specification to generate smaller RTF files.
You might wonder why then offer to save "non-supercompact" RTFs if "supercompact" RTFs are always smaller than their "traditional" counterparts? The answer is very simple: not every word processing application supports all the features of the RTF specification. Consequently not every software can display supercompact RTFs correctly. Luckily, this mainly applies to older word processors. All major modern word processors (including MS Word and OpenOffice) display the supercompact RTFs of Atlantis as intended. So you might need to uncheck the "Save supercompact RTF documents" option in Atlantis only if you are going to send your RTF documents to someone whose word processor cannot display supercompact RTFs correctly.
OK, then what's exactly the difference between "supercompact RTFs" and "non-supercompact RTFs"? If you need technical details, here they are:
1) A paragraph in traditional RTFs is normally terminated by a sequence of 6 characters (bytes):
\par<carriage_return><line_feed>
"<carriage_return><line_feed>" (or CR/LF - two bytes with codes 13 and 10) is a standard combination terminating any line in most plain text files in Windows.
A paragraph in supercompact RTFs is terminated by 2 characters (bytes) only:
\<carriage_return>
You save 4 bytes per paragraph if you save the document as supercompact.
2) Most non-English characters in traditional RTFs are stored in a 4-byte format:
\'<NN>
<NN> is a two-byte character code in hexadecimal format.
In supercompact RTFs, such characters are normally saved as a single byte containing the ANSI code of a character.
For example, the "é" letter (e-acute) is saved to traditional RTFs as
\'e9
This "é" letter is stored within supercompact RTFs as a single byte with code 233.
So, you save 3 bytes per a non-English character if you save as supercompact.
3) Finally, a difference which makes supercompact files really a useful option.
Pictures are always stored in traditional RTFs as Windows metafiles.
In supercompact RTFs, pictures are stored as PNGs or JPEGs.
In most cases, metafiles are much bigger than their counterparts in the PNG or JPEG format. Have I said "much bigger"? I actually wanted to say "MUCH-MUCH bigger". A tenfold difference in size between the metafile and PNG versions of the same picture is a completely normal thing.
So if your RTF document contains pictures, you can DRAMATICALLY shrink its file size by saving as supercompact RTF.
Friday, November 6, 2009
Tweaking ePubs (3): Page margins
More tips on what you might need to adjust in your EPUB files generated by Atlantis.
Any Atlantis EPUB contains a CSS file with the book formatting. You can view/edit this CSS file with the tweak_epub utility:
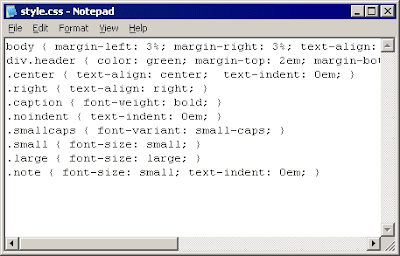
The first line of this style.css normally contains this text:
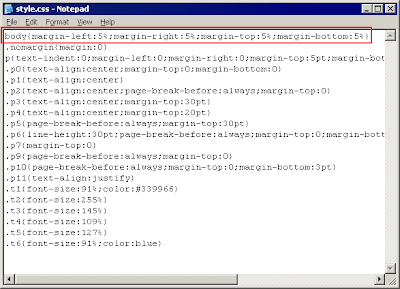
By modifying numbers in this line, you can control page margins of your book:
Any Atlantis EPUB contains a CSS file with the book formatting. You can view/edit this CSS file with the tweak_epub utility:

The first line of this style.css normally contains this text:

By modifying numbers in this line, you can control page margins of your book:

Wednesday, November 4, 2009
Tweaking ePubs (2): Metadata
You already know how to make adjustments to existing EPUB files.
So what you might need to change in EPUBs generated by Atlantis?
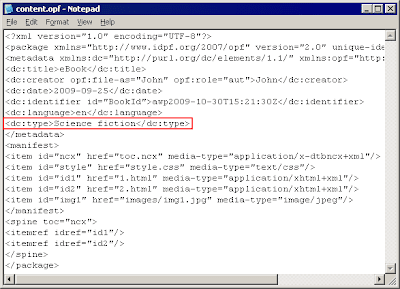
Sometimes authors need to add extra metadata to their EPUBs. Metadata is stored within the file with .opf extension. If you open any Atlantis EPUB with the tweak_epub utility (or with any ZIP software), you will find a file called "content.opf" under the "Ops" folder:
This file contains a separate section with metadata:
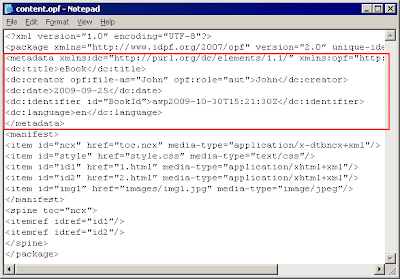
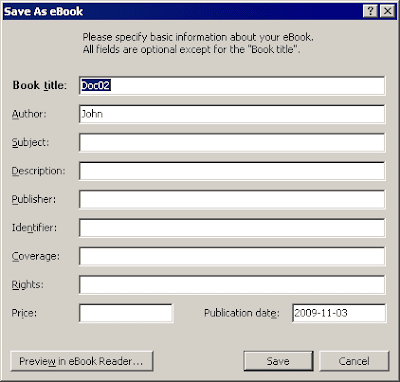
On the above screen capture, the EPUB file contains 5 metadata items: title, creator, date, identifier, and language. When you save a document as eBook in Atlantis, you can instruct Atlantis to add more metadata items to the book's content.opf file by specifying the corresponding "basic information" about your book in the "Save as eBook" window:
But you might still need to add metadata not supported by the "Save as eBook" window of Atlantis. In such cases you could add it manually to content.opf. For example, you could add a "book genre" metadata to your EPUB:
You can find more information on EPUB metadata in the corresponding section of the EPUB specification.
So what you might need to change in EPUBs generated by Atlantis?
Sometimes authors need to add extra metadata to their EPUBs. Metadata is stored within the file with .opf extension. If you open any Atlantis EPUB with the tweak_epub utility (or with any ZIP software), you will find a file called "content.opf" under the "Ops" folder:

This file contains a separate section with metadata:

On the above screen capture, the EPUB file contains 5 metadata items: title, creator, date, identifier, and language. When you save a document as eBook in Atlantis, you can instruct Atlantis to add more metadata items to the book's content.opf file by specifying the corresponding "basic information" about your book in the "Save as eBook" window:

But you might still need to add metadata not supported by the "Save as eBook" window of Atlantis. In such cases you could add it manually to content.opf. For example, you could add a "book genre" metadata to your EPUB:

You can find more information on EPUB metadata in the corresponding section of the EPUB specification.
Monday, November 2, 2009
Tweaking ePubs: It's just a ZIP file!
Did you know that any eBook in the EPUB format is just a ZIP file but with the .epub file extension? EPUBs normally contain multiple files in different formats: XHTML, XML, JPG, etc. If you rename any .epub file to .zip, you can open it in any file compression software.
Since Atlantis automatically generates all the required EPUB components, and puts them into a ZIP file in the proper order, you do not necessarily need to know what's inside your EPUB books generated by Atlantis. But if you are familiar with the EPUB specification, at times you might need to make minor adjustments to your EPUBs not possible directly through the GUI of Atlantis.
So how to modify individual files within the EPUB package?
Since EPUBs are actually ordinary ZIP files, you can change their file extension to .zip, and open in your ZIP software. Then extract files of interest, modify them in a text editor, and put back in the ZIP file. File extension has to be changed back to .epub.
But there is one important detail to remember when you modify an EPUB file in a ZIP software. The first file in any proper EPUB package must be "mimetype". It is always a 20-byte ASCII file containing this string of text:
application/epub+zip
Even more, this file must be always stored within the EPUB package in uncompressed form.
So before tweaking your EPUB files with a ZIP software, you should be sure that it will preserve the original order of files, and leave the "mimetype" file uncompressed. Not every ZIP software will allow such "delicate" changes to a ZIP file.
But we can suggest an alternative solution to EPUB tweaking. The tweak_epub utility will allow you to adjust any text file from an EPUB package in a quite convenient way. You can download this utility from our site. Just click the following link:
http://www.AtlantisWordProcessor.com/download/tweak_epub.exe
and download a small file "tweak_epub.exe" (~100 KB) to any folder on your hard disk.
This utility does not require installation. Just run this "tweak_epub.exe" whenever you need to tweak an EPUB file.
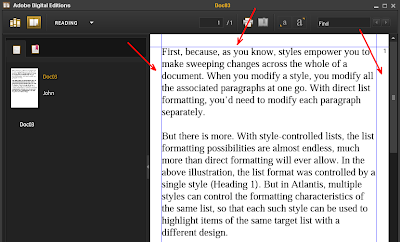
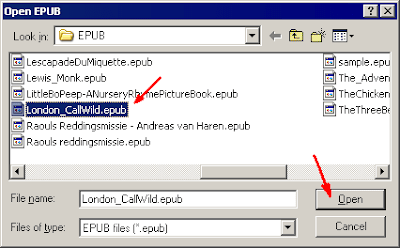
It will display the "Open EPUB" window:
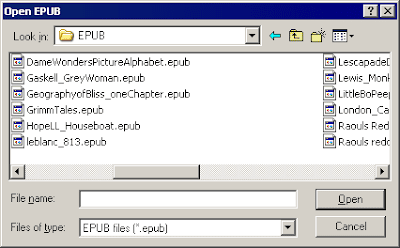
Direct it to the EPUB file of interest, and click "Open".
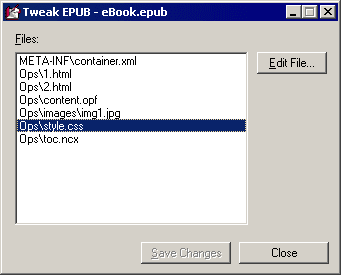
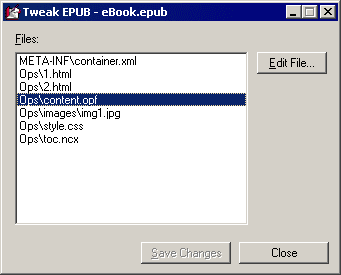
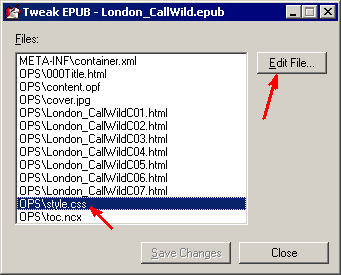
It will display another window with a complete list of files contained within your EPUB:
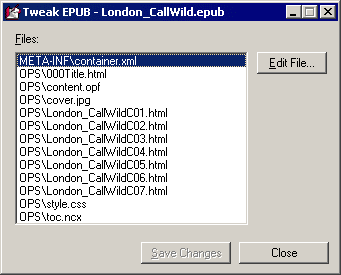
Click a file that you would like to modify (on the below screen capture – a file with CSS styles), then the "Edit File..." button:
The selected file will be opened in Notepad:
When you are done with editing this file, click the cross button in the title bar of Notepad, or press Alt+F4. You will get a confirmation message from Notepad:

Click "Yes" if you want to save changes.
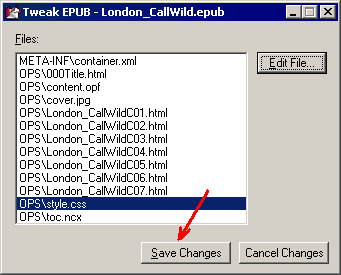
The "Save Changes" button of the "tweak_epub" utility will become enabled:
You can click this button to complete editing the EPUB file, and save all the modified text files back to the EPUB package. Of course, you can always click the "Cancel Changes" button if you do not want to save changes to the EPUB file.
By the way, it is recommended to make a copy of the original EPUB file before tweaking it. Just in case you make an editing mistake.
Since Atlantis automatically generates all the required EPUB components, and puts them into a ZIP file in the proper order, you do not necessarily need to know what's inside your EPUB books generated by Atlantis. But if you are familiar with the EPUB specification, at times you might need to make minor adjustments to your EPUBs not possible directly through the GUI of Atlantis.
So how to modify individual files within the EPUB package?
Since EPUBs are actually ordinary ZIP files, you can change their file extension to .zip, and open in your ZIP software. Then extract files of interest, modify them in a text editor, and put back in the ZIP file. File extension has to be changed back to .epub.
But there is one important detail to remember when you modify an EPUB file in a ZIP software. The first file in any proper EPUB package must be "mimetype". It is always a 20-byte ASCII file containing this string of text:
application/epub+zip
Even more, this file must be always stored within the EPUB package in uncompressed form.
So before tweaking your EPUB files with a ZIP software, you should be sure that it will preserve the original order of files, and leave the "mimetype" file uncompressed. Not every ZIP software will allow such "delicate" changes to a ZIP file.
But we can suggest an alternative solution to EPUB tweaking. The tweak_epub utility will allow you to adjust any text file from an EPUB package in a quite convenient way. You can download this utility from our site. Just click the following link:
http://www.AtlantisWordProcessor.com/download/tweak_epub.exe
and download a small file "tweak_epub.exe" (~100 KB) to any folder on your hard disk.
This utility does not require installation. Just run this "tweak_epub.exe" whenever you need to tweak an EPUB file.
It will display the "Open EPUB" window:

Direct it to the EPUB file of interest, and click "Open".

It will display another window with a complete list of files contained within your EPUB:

Click a file that you would like to modify (on the below screen capture – a file with CSS styles), then the "Edit File..." button:

The selected file will be opened in Notepad:

When you are done with editing this file, click the cross button in the title bar of Notepad, or press Alt+F4. You will get a confirmation message from Notepad:

Click "Yes" if you want to save changes.
The "Save Changes" button of the "tweak_epub" utility will become enabled:

You can click this button to complete editing the EPUB file, and save all the modified text files back to the EPUB package. Of course, you can always click the "Cancel Changes" button if you do not want to save changes to the EPUB file.
By the way, it is recommended to make a copy of the original EPUB file before tweaking it. Just in case you make an editing mistake.
Sunday, November 1, 2009
Your first eBook
Have you ever dreamed of writing a book of your own? Even more, have you ever dreamed of writing for a living?
If you don't know how and where to start, below you'll find a compilation of links to websites with tips on planning, writing, promoting, and selling eBooks:
Writing your first book
Guide to writing your first book
Writing your first eBook
How to write eBooks that people actually want to buy
How to make money writing eBooks
How to write an eBook to sell on the Internet
How to advertise an eBook
Good luck!
Subscribe to:
Posts (Atom)