Saturday, March 27, 2010

Batch reencryption

Do you have documents that you need to keep hidden from prying eyes? Most of us have such documents.

In Atlantis you can store any document in a special encrypted format. Once encrypted, a document can only be opened by those who know the password used to encrypt the document.

The Atlantis encryption is very secure. But there is still one thing that you are supposed to do as a document owner in order to keep your encrypted documents safely protected. You need to choose a good long password for each document. In this respect, our ImagiPass software can help you greatly in creating and memorizing long secure passwords for your documents.

Now for maximum security the best thing to do is to encrypt each document with a different password. But this is not always possible in practice, and quite many people use the same password to encrypt all their "sensitive" documents. If it is your case, here is one thing that will help you make things more secure: re-encrypt your documents with a different password from time to time. Using the same password to encrypt all your documents is risky but using it for a long time is even riskier. So it might be a good idea to switch to a new password from time to time.

If you have only one encrypted document, changing its password is simple. You only need to open the document with your old password, choose the "File | Save As..." menu command, and ask Atlantis to re-save it under its current filename. Obviously the "encrypted" format has to be kept in the "Save as type" box:


And when you click the "Save" button in this "Save document as" dialog, Atlantis will ask you for a new password.

This is how you can change the password for a single encrypted document.

But what if you have hundreds or even thousands of encrypted documents? Changing their passwords through the "File | Save As..." command of Atlantis would be a nightmare.

This is when the Atlantis Batch conversion feature comes in handy.

Let's suppose that you want to change the single password used for all the encrypted documents stored on your "C" disk. Here is how to proceed:

Choose the "File | Save Special | Batch Conversion..." menu command of Atlantis. Select "COD" as the source and target format in the "Batch Conversion" dialog. Also specify identical source and destination folders (the root of the "C" disk in our example):
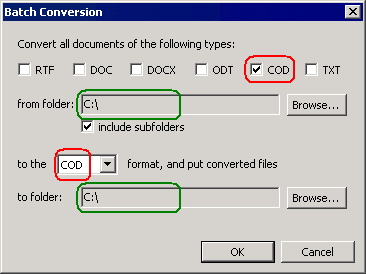

Click OK in the "Batch conversion" dialog. Atlantis will require the password for the first COD document in the folder. Enter your "old" password (the one that you previously used to encrypt all your COD documents). Also make sure that "Try opening all encrypted documents with this password" is checked:
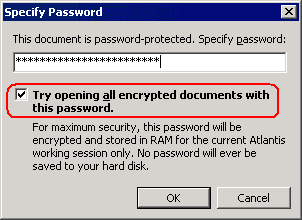

Click OK. Atlantis will display another window:
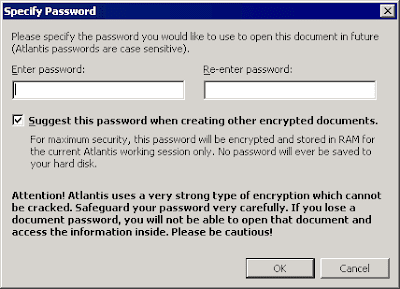

Specify a new password, and click OK. Atlantis will re-encrypt all the COD documents found on disk "C" with the new password.
Monday, March 22, 2010

Release of Atlantis 1.6.5.1

Atlantis Word Processor 1.6.5.1 is available as a public release.

You can find the complete list of new features and changes in this version of Atlantis by clicking here.

There are multiple ways to upgrade your copy of Atlantis Word Processor to the latest version.

If you do not have Atlantis Word Processor on your computer yet, you can install this new version of Atlantis by running the latest setup file of Atlantis. Click here to download it.

Friday, March 19, 2010

Changing file associations

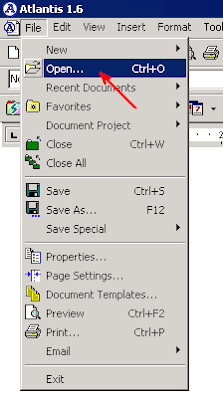
All word processing applications have internal commands to open documents from hard disks. In Atlantis this command is found under the "File" menu:


This command simply calls up the "Open Document" dialog where you can select one or several documents to open in Atlantis. This is the standard traditional way to open documents from the running instance of any application. But in most cases you can open documents without first launching Atlantis manually and using its "File | Open..." command. Here is how it can be done.

When you double-click a document file name in Windows Explorer or its shortcut on your Desktop, Windows checks if the corresponding document type (RTF, DOC, TXT, etc) might not already be associated with a default application on your system. When this is the case, Windows launches the default application and asks it to open the double-clicked document.

Understandably, documents are traditionally associated with word processors: what better application could be used to deal with documents than a word processor? So when you double-click a document file name in Windows, it normally gets opened in the default word processor for the corresponding document type. You can start viewing or editing the document immediately.

Finding out which word processor is default for a given document type on your system is quite easy: simply double-click a document file name in Windows Explorer, and the associated default word processor will automatically be launched.

Now you might want to change the word processor currently used as default for a document type on your system.

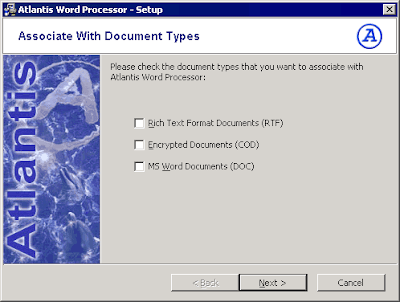
This can be done when you install or upgrade Atlantis Word Processor. During setup, Atlantis displays a dialog with check boxes for the document types that it supports:


If you want to make Atlantis your default word processor for any of these document types, all you need to do is check the corresponding box(es) in the above dialog.

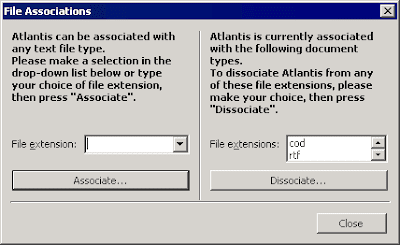
If you haven't associated a document type with Atlantis during install, and would like to do it later on, things are also very easy. Simply run the "Tools | File Associations..." main menu command in Atlantis. Atlantis will open the following dialog:


You can then use the left part of this dialog to select a file extension (or file "type") not yet associated with Atlantis, and associate it right away with a click on the … Associate button. :)

We recommend using Atlantis to associate file types, wether during install, or as we've just seen from the "Tools | File Associations..." dialog. This is because Atlantis not only associates itself with the requested document type, but it also memorizes which application was previously associated with the same document type. In this way, you can always easily revert to past associations from Atlantis, using the right part of the above "File Associations" dialog. You only have to select the document type to be dissociated from Atlantis, then to click the "Dissociate..." button.

Atlantis will not only dissociate itself from the selected document type, but it will also automatically restore the previous association. Let's take an example. Let's suppose that WordPad was originally your default application for RTF documents, and that you subsequently substituted Atlantis for this process. Atlantis will memorize that WordPad previously was your default word processor for RTF documents. If you later change your mind and ask Atlantis to dissociate itself from the RTF document type, it will do so but it will also restore the old default association of RTF documents with WordPad. Note that uninstalling Atlantis will also automatically restore file associations previously modified and "backed -up" by Atlantis.

Obviously, associating Atlantis with a document type is very easy. Dissociating it is just as easy.

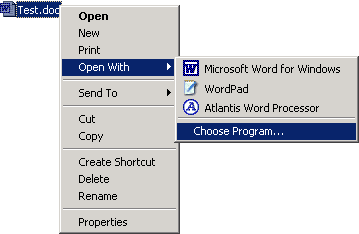
Now Windows offers yet another way to change file associations. This won't "backup" previous associations, and consequently won't include a "dissociate" feature. But you can use it to associate ANY file type with ANY application under Windows. Here is how it goes:

Simply right-click a file of the desired type in Windows Explorer, and run the "Open With | Choose Program..." command from the menu:


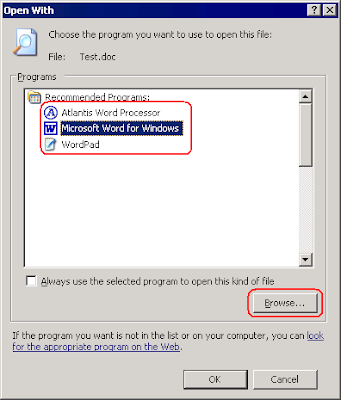
This will bring up the "Open With" dialog. Choose a program from the list of "Recommended Programs", or click the "Browse..." button to choose a new default application for your document type:


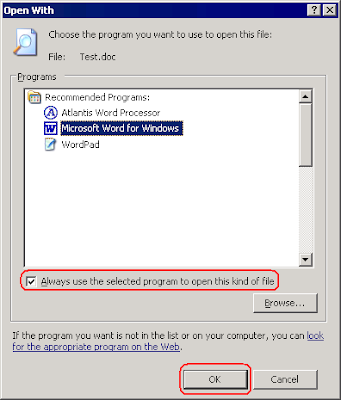
After this, check "Always use the selected program to open this kind of file", and OK out of the dialog:


From then on you'll be able to open documents in your new default word processor by double-clicking their file names in Windows Explorer or on the Windows Desktop.

Please be careful. If you associate a document type with a wrong application, there won't be any automatic way to reverse changes. You will have to recreate the previous association manually.

Sunday, March 14, 2010

Atlantis settings, or When the late bird gets the worm

In most cases Atlantis is represented by a single button on the Windows Taskbar no matter how many documents you create or open simultaneously. On the other hand, each open document has its own separate button on the Atlantis Document Bar within the Atlantis main window. This is so that Atlantis will always leave enough elbowroom on the Windows Taskbar for the buttons of other applications. Having a single running instance of Atlantis also saves system resources: only one main window with menus, toolbars, status bar, Control Board is created instead of several.

So whenever possible Atlantis tries to keep only one running instance of itself. For example, when you double-click a document associated with Atlantis in Windows Explorer, your Windows system automatically starts launching a new instance of Atlantis to open that document. But this is not the whole story. When it is launched, Atlantis always checks if it might not already be running. When another instance of Atlantis is already running (and it is not busy displaying a modal dialog), the new instance launched by your Windows system simply shuts itself down quietly without even getting into view, and the requested document opens in the first running instance of Atlantis. In other words, Atlantis automatically cancels any redundant instance of itself.

However at times you might end up with two running instances of Atlantis, each running instance having its own "main window" and its own button on the Windows Taskbar. This happens when the first instance of Atlantis is busy performing some other important action and cannot be distracted from the job in hand. In such cases, a new instance of Atlantis is actually launched to answer the Windows system call.

Having several running instances of Atlantis is unproblematic provided your system has enough resources. What's more in some cases you have no choice but to run an extra instance of Atlantis in order to complete a task. Let's take an example. Let's suppose that you have started specifying properties for an eBook in the modal dialog displayed by the Save as eBook command of Atlantis. You then realize that you need to retrieve some of the required information from another Atlantis document. But you cannot open that document right now in Atlantis without closing the "Save as eBook" modal dialog. This would make you lose all the eBook properties already entered. In such cases, it is much smarter to leave the "Save as eBook" dialog open, but launch an extra instance of Atlantis, and open the document in that new instance.

You might ask "how do I launch a new instance of Atlantis?” Simply double-click the Atlantis shortcut on the Windows Desktop, or click the "Start" button on the Windows Taskbar and choose the Atlantis shortcut in the "Program Files" menu.

You can then open any relevant document in the new instance of Atlantis and send the required information to the Windows clipboard (select and copy with Ctrl+C). That information can then be pasted into the original "Save as eBook" dialog with Ctrl+V after you have switched to the first instance of Atlantis.

Of course, you can close the second instance of Atlantis when you have finished retrieving and pasting all the necessary information.

Again there is nothing wrong with running multiple instances of Atlantis. But there is one important caveat. Whenever you launch an instance of Atlantis, it normally loads its settings from the Windows Registry. When you close an instance of Atlantis, it also normally saves all its current settings back to the Windows Registry, including any changes that you might have made to them. Now at times you might configure the settings of each running instance of Atlantis differently. In such cases, it matters which running instance is closed last.

Let's take an example. Let's suppose that you have two running instances of Atlantis.

Let's suppose that you have assigned new hot keys to some commands in one of these two instances of Atlantis. You close that instance in any available way (i.e. pressing Alt+F4, or clicking the cross button on the title bar of the main window). It automatically saves its current settings (including your new hot keys) to the Registry.

Now you close the second running instance of Atlantis. It will also automatically save its current settings to the Registry. These settings will naturally override the settings saved by the first instance of Atlantis. But these latter settings do not include the new hot keys specified in the first running instance of Atlantis. In other words, the settings saved by the instance of Atlantis that you closed first are lost.

So when you run multiple instances of Atlantis, and you close them all, it is important to remember that only the settings of the last closed instance of Atlantis are kept in the Registry. In other words, when you launch Atlantis again, it will run with the settings that were last saved.

In practical terms, it will always be preferable to make configuration changes only in the running instance of Atlantis that you intend to close last.

Thursday, March 11, 2010

Secret weapon of the Format Brush

You could hardly be unaware of the Format Brush of Atlantis – a tool to format text exclusively with the mouse in the most convenient and natural way. Its button – – sits right in the middle of the Atlantis toolbars.

There are two standard ways to use the Format Brush:

1) If you need to format a single text fragment, select it in the document, then click a suitable format in the drop-down menu attached to the Format Brush toolbar button. The selected text fragment is immediately reformatted accordingly.

2) If you need to apply identical formatting to multiple text fragments, first make sure that there is no selection in the document (click anywhere in the document to cancel any selection). Then either click the Format Brush toolbar button, or directly choose a format in the associated drop-down menu. This will activate the special Format Brush mode. Since Atlantis has no selection to target, no formatting will be applied to the document straightaway. But the mouse pointer will take on a special shape if you hover it over any document text:


This "paintbrush" mouse cursor can now be used to "select" text fragments, just as you would with the standard mouse cursor. But you won't only select text. You will also apply the formatting currently loaded onto the Format Brush to the target fragments of text.

Now you might ask "how can I tell which formatting is loaded onto the Format Brush?" Or "how can I load different formatting attributes onto the Format Brush?"

As you probably noticed, when you activate the Format Brush mode some of the Atlantis toolbar commands become framed or highlighted with aqua, blue, or red coloring:


This special color coding indicates

  • which formatting will be appliedred color,
  • which will remain inactive (unchanged by the Format Brush) – aqua color,
  • and which will be removed if found in the target fragments (blue color).

In this way, you can tell what exactly will happen to the fragments you "select" with the special "paintbrush" mouse cursor. Note that the Format Brush color coding is explained in details in the corresponding topic of the Atlantis Help.

The formatting attributes loaded onto the Format Brush can be changed in two different ways. You can either

  • click any of the formatting toolbar commands framed with one of the 3 special colors, and adjust the corresponding value(s) as suitable,
  • or choose one of the preset Format Brush items available directly from the associated drop-down menu .

When you are done, you can cancel the Format Brush mode with a click on the Format Brush toolbar button itself , or with a press of the Esc key.


All the above is part and parcel of the standard behavior of the Atlantis Format Brush and it might be no news to you.

But you might not be aware of this other way of using the Atlantis Format Brush mode:

Let's suppose that the Format Brush mode is on, and you have loaded appropriate formatting characteristics onto the Format Brush. Put the mouse aside and use the keyboard instead. Use the cursor keys to navigate within the document text. In the document window, the blinking caret or "insertion cursor" will show you where any typing would add new text to the document. Type text as needed. The Format Brush mode being active, the typed text will automatically be formatted as specified for the current Format Brush.

For example let's suppose that you loaded "bold+italic" formatting onto the Format Brush. You can now add new "bold + italic" text to any spot in the document. Simply navigate to the target location with the cursor keys and start typing. Atlantis will automatically format the typed text as set for the Format Brush mode.

Friday, March 5, 2010

Batch conversion

Changing the file type or format of a document (let's say from RTF to DOC, or from TXT to DOCX) is easily done with the "File | Save As..." command of Atlantis (F12). You only need to choose a different document format in the "Save as type" box of the "Save Document As" dialog:


This requires only a few mouse clicks and is OK if you want to change the format of only a few documents. But when you have many more documents to convert (sometimes hundreds or even thousands of them), the "Save As" method is inadequate. Things might take hours to complete and not be fail-safe (you might overlook some of the documents or convert them to a wrong format).

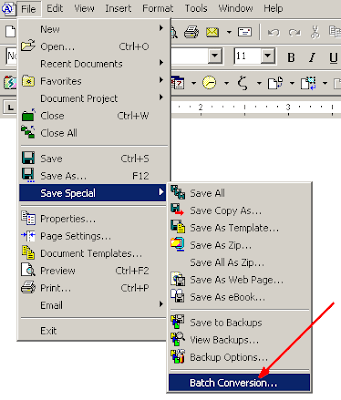
This is why Atlantis Word Processor 1.6.5.1 introduces a new feature allowing you to convert many documents at one go. Under the "File | Save Special" menu, you will find a new "Batch Conversion..." command:


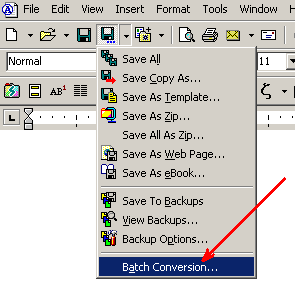
This command, like all other commands in the "File | Save Special" menu, is mirrored in the drop-down menu of the "Save As" toolbar button:


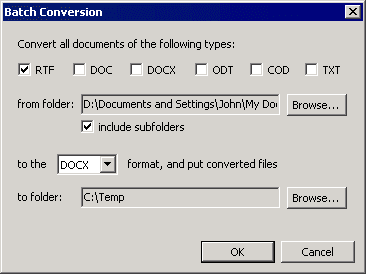
This new "Batch Conversion" command displays a dialog allowing you to convert any number of documents with a few mouse clicks:


First, choose the format(s) of the documents to convert (you can select several file types together):


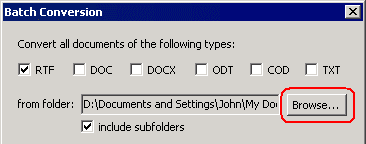
Then specify the location of the source documents (click the "Browse..." button):


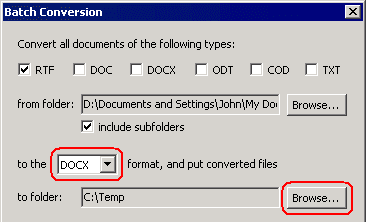
And finally choose the target format and folder for the converted files:


Note that the Atlantis "Batch conversion" command always overrides existing files of same name if any. So we suggest you use or create an empty folder to host the converted files. But of course, you can choose any non-empty folder if you don’t mind overwriting existing files.
Also note that the source and target folders can be identical. In that case the converted files are placed alongside the source files.

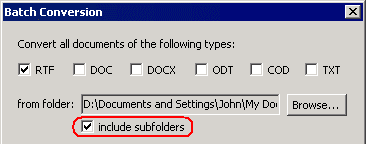
When the "include subfolders" box is checked:


and the source folder does have subfolders, Atlantis

• converts all documents found in the source folder and all its subfolders,
• and places the converted files in the target folder, using mirror subfolders with corresponding names.

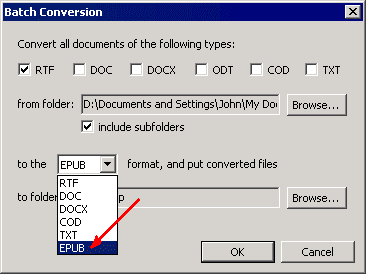
Of course, this "Batch conversion" command can be used to convert documents between the standard document formats supported by Atlantis (RTF, DOC, DOCX, ODT, COD and TXT). But it can also be used to convert documents to the EPUB format (the eBook format supported by Atlantis). You only need to choose "EPUB" as the target format in the drop-down:


This "Batch conversion" command has already been included in the latest beta version of Atlantis Word Processor 1.6.5.1 which you can download from the betatesting page.

Wednesday, March 3, 2010

Retrieving document pictures

There are multiple ways to insert pictures in an Atlantis document. You can use the "Insert | Picture..." menu command or the associated toolbar button . You can also select the pictures in your file manager, then use your mouse pointer to drag & drop them into an Atlantis document. You can paste pictures into an Atlantis document if you previously put them onto the Windows clipboard (from Atlantis or any other application).

You can also collect pictures from Web pages in the Clippy Bank of Atlantis. Here is how to proceed:

1) Click the "Clippy Bank collects clipboard data" toolbar button .

You might need to switch to the Alternative set of toolbar buttons first to be able to use that particular button. The Alternative set of toolbar buttons itself is displayed by pressing the Ctrl key twice.

2) Send the target pictures from Web pages to the Windows clipboard by right-clicking them in a Web browser, and choosing the "Copy" command from the popup menu. These pictures will automatically be pasted into the Atlantis Clippy Bank (the Atlantis Clippy Bank is displayed with the F8 hot key or the "View | Clippy Bank" menu command).


But how do you retrieve pictures from an Atlantis document (including the Clippy Bank) and save them as graphic files to your disk?

Easy.

1) Press Ctrl+A to "select all" in the Atlantis document.

2) Scroll the document window with the mouse wheel or the vertical scrollbar until at least one of the pictures gets into view.

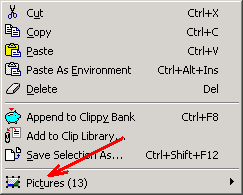
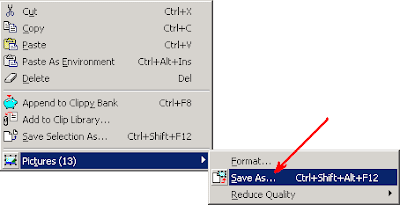
3) Right-click any of the pictures within the selection. The context menu that pops up will contain a "Pictures" sub-menu. The number in brackets after "Pictures" indicates how many pictures are present in the current selection:


Click to open the "Pictures" sub-menu, then click again to activate the "Save As..." command:


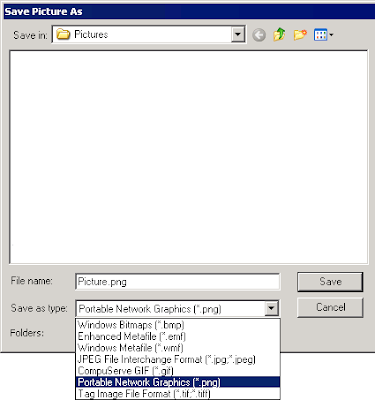
4) Atlantis will display the "Save Picture As" dialog window. Use the "Save as type" box to choose a graphic format for the pictures:


Also use the "File name" box to specify any appropriate name for the first graphic file.

If you choose a numberless name like "Picture.png" for the first picture, Atlantis will save all remaining graphic files in the current selection as "Picture2.png", "Picture3.png", and so on.

If you include a number right before the period in the filename – for example, "Image020.png" – Atlantis will save the remaining graphic files as "Image021.png", "Image022.png", and so on.

Monday, March 1, 2010

Running Atlantis with "factory" settings

Hundreds of different options and settings are offered through different features of Atlantis. Most of them are saved to the Windows Registry when you close Atlantis, and reloaded from the Registry when you launch Atlantis again.

The only purpose of these different options is to allow you to customize Atlantis to your liking. By adjusting them you can make Atlantis work and look in the way YOU want. However, at times you might change a few settings accidentally or without anticipating how those changes will affect the behavior of Atlantis on your system. Some features of Atlantis might start working in a wrong way, or you might even be unable to complete your tasks in Atlantis.

In such cases, it is always a good idea to check if the current misbehavior of Atlantis might not be linked to your current Atlantis settings. The simplest way to do so is by launching a copy of Atlantis with its default "factory" settings. Here is how to proceed:

1) Click the "Start" button of the Windows Taskbar, and choose the "Run..." command. Alternatively just press the WinKey+R hot key of Windows.
This will open the "Run" dialog of Windows.

2) Paste the following command-line in the "Open" edit box:

"C:\Program Files\Atlantis\Atlantis.exe" -dls -dss

Note that the above command-line assumes that you installed Atlantis to the "C:\Program Files\Atlantis\" default folder. If you actually installed Atlantis in a different folder, you should adjust the above "Run" command-line accordingly.

3) Click the "OK" button in the "Run" dialog.

Since the command-line contains the "-dls" switch which means "don't load settings from anywhere", this will launch a copy of Atlantis with the default settings.
The "-dss" switch itself means "don't save modified settings on close". This is so that your previous Atlantis settings are not affected in the Windows Registry when you close such a copy of Atlantis.

Note that you might also need to reenter your registration details when you launch a copy of Atlantis through the above command-line. Otherwise Atlantis might fail to launch with its default settings.

Now that Atlantis is launched with its default settings, you can check out if it behaves correctly. If it does work correctly, it might be a good idea to replace the faulty Atlantis settings currently stored in the Windows Registry with the default settings of Atlantis. This is done with the following command-line:

"C:\Program Files\Atlantis\Atlantis.exe" -dls

Unlike the previous command-line, the above command-line does not include the "-dss" switch. This means that Atlantis will save its current settings to the Registry on close.

After that, Atlantis can be launched in the standard way through the "Start | Programs" menu of the Windows Taskbar, or by clicking the Atlantis shortcut on the Windows Desktop. Atlantis will then run smoothly with its "factory settings". You can still customize it again to your liking.