 . You can also select the pictures in your file manager, then use your mouse pointer to drag & drop them into an Atlantis document. You can paste pictures into an Atlantis document if you previously put them onto the Windows clipboard (from Atlantis or any other application).
You can also collect pictures from Web pages in the Clippy Bank of Atlantis. Here is how to proceed:
1) Click the "Clippy Bank collects clipboard data" toolbar button
 .
.You might need to switch to the Alternative set of toolbar buttons first to be able to use that particular button. The Alternative set of toolbar buttons itself is displayed by pressing the Ctrl key twice.
2) Send the target pictures from Web pages to the Windows clipboard by right-clicking them in a Web browser, and choosing the "Copy" command from the popup menu. These pictures will automatically be pasted into the Atlantis Clippy Bank (the Atlantis Clippy Bank is displayed with the F8 hot key or the "View | Clippy Bank" menu command).
But how do you retrieve pictures from an Atlantis document (including the Clippy Bank) and save them as graphic files to your disk?
Easy.
1) Press Ctrl+A to "select all" in the Atlantis document.
2) Scroll the document window with the mouse wheel or the vertical scrollbar until at least one of the pictures gets into view.
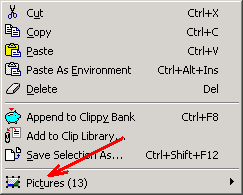
3) Right-click any of the pictures within the selection. The context menu that pops up will contain a "Pictures" sub-menu. The number in brackets after "Pictures" indicates how many pictures are present in the current selection:

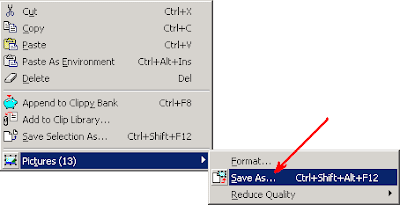
Click to open the "Pictures" sub-menu, then click again to activate the "Save As..." command:

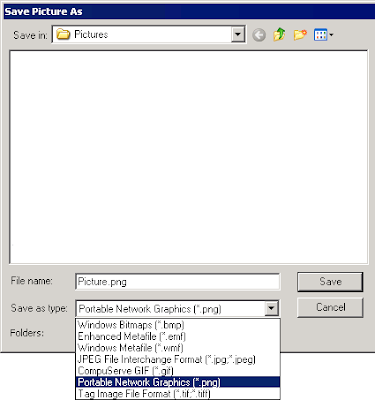
4) Atlantis will display the "Save Picture As" dialog window. Use the "Save as type" box to choose a graphic format for the pictures:

Also use the "File name" box to specify any appropriate name for the first graphic file.
If you choose a numberless name like "Picture.png" for the first picture, Atlantis will save all remaining graphic files in the current selection as "Picture2.png", "Picture3.png", and so on.
If you include a number right before the period in the filename – for example, "Image020.png" – Atlantis will save the remaining graphic files as "Image021.png", "Image022.png", and so on.
No comments:
Post a Comment