Friday, February 26, 2010

Highlighting and Font Format

The "Highlight" tool is one of the most basic and often used features of Atlantis.

You can review documents and use specific background color(s) to highlight fragments of particular interest and draw readers' attention to them.

You can also use the "Highlight" tool as an ordinary font formatting tool to change the look of specific fragments. The "Banner creation" document demonstrates how the "Highlight" tool can be used to achieve various visual effects in a document. It is part of the Atlantis collection of Sample documents.

In Atlantis Word Processor 1.6.5.1, this "highlight color" (or simply "highlight") becomes a fully-fledged font formatting attribute:

1) You can now change the highlight characteristics of the document selection from the "Font | Format..." window of Atlantis:


2) The "Copy font format" and "Paste font format" commands of Atlantis now transfer highlight colors between text fragments.

3) The Highlight attribute can now be included in paragraph styles through the "Format | Style... > Modify... > Font..." command, or through the corresponding commands of the Styles panel of the Atlantis Control Board.

4) Highlight can also be included in the Format Palette items, and consequently used through the Format Brush tool of Atlantis.


Atlantis Word Processor 1.6.5.1 is currently under betatesting. You can download it from the Betatesting page of our site.

Wednesday, February 24, 2010

Opening multiple documents

When you open documents in Atlantis with the "File | Open..." menu command, or the corresponding toolbar button , or the associated hot key (Ctrl+O), Atlantis displays the "Open Document" window. You click in the left pane of the window to select the target document file, then press the "Open" button. Or even simpler, you just double-click the document file in the left pane. Atlantis opens the target document.

Now you might want to open several documents together. In such cases, you can always call up the "Open Document" dialog repeatedly as many times as necessary to open each document separately, one after the other. But this is extremely cumbersome. As a matter of fact, there is a much more convenient and faster way to open several documents together.

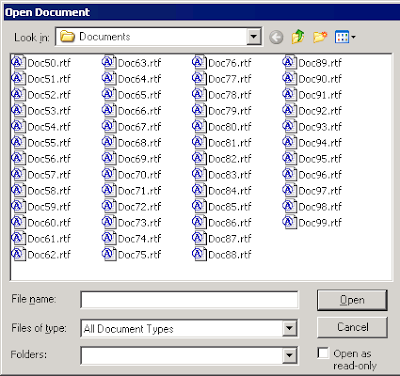
Let's suppose that you have plenty of document files in a folder on your hard disk:


Let's now suppose that you want to open all documents from document number "50" to "59" (files "Doc50.rtf" through to "Doc59.rtf"). All you need to do is click to select the first document in your target group ("Doc50.rtf" in our example):


When the first document is selected in this way, press and hold the Shift key down, and click to select the last document of your target group ("Doc59.rtf" in our example). All the documents from first to last in the target group will automatically be selected in the "Open Document" window:
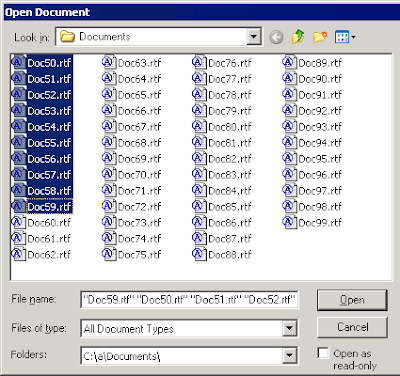

Release the Shift key and avoid clicking in the file list again. Instead, click the "Open" button. All 10 files will open together in Atlantis.


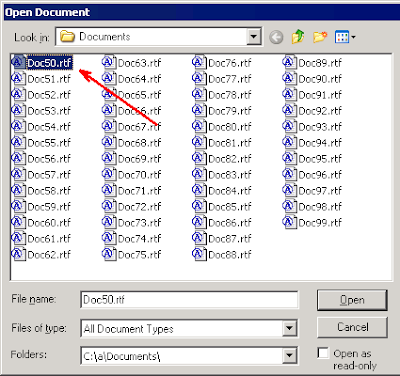
At times, you might want to open documents that are not listed contiguously in the "Open Document" window. This is also extremely easy. Let's suppose that you want to open "Doc50.rtf", "Doc65.rtf", "Doc72.rtf", "Doc86.rtf", and "Doc99.rtf" in the same folder. Here is how to proceed.

First, click to select "Doc50.rtf" (the first file of interest):


Then press and hold the Ctrl key down, and click repeatedly to select each one of the other files of interest ("Doc65.rtf", "Doc72.rtf", "Doc86.rtf", and "Doc99.rtf" in our example):
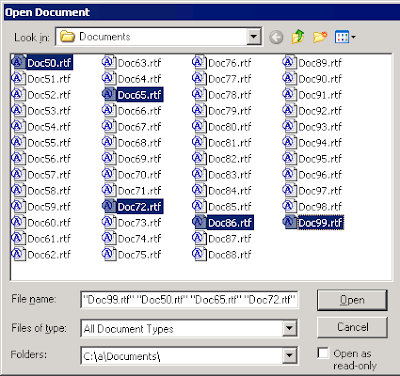

Release the Ctrl key and avoid clicking in the file list again. Instead, click the "Open" button. The selected files will open together in Atlantis.

We just saw that you can add a file to a selection if you press and hold the Ctrl key down, then click on an unselected file name. But at times you might want to remove one or several files from a selection. This is also done with the Ctrl key: press and hold the Ctrl key down, then click on an already selected file name. That file will automatically be removed from the selection.

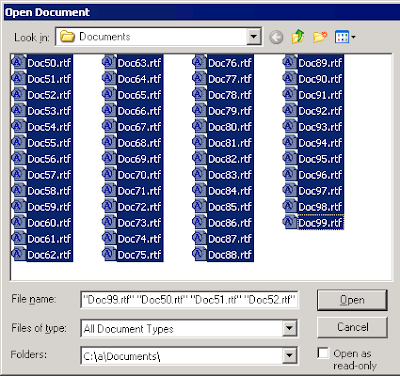
Let's take an example. Let's suppose that you need to open documents "Doc50.rtf" through "Doc99.rtf" except document files "Doc70.rtf" and "Doc80.rtf". For this, click the first document "Doc50.rtf", then press and hold the Shift key, click "Doc99.rtf", and release the Shift key. This will select all documents from "Doc50.rtf" through to "Doc99.rtf":


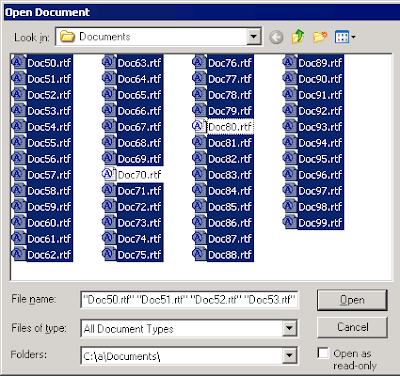
Now we want to exclude files "Doc70.rtf" and "Doc80.rtf" from the above list. Let's press and hold the Ctrl key down, and click the "Doc70.rtf" and "Doc80.rtf" file names. They will automatically be excluded from the selection:


Release the Ctrl key and avoid clicking in the file list again. Instead, click the "Open" button. The selected files will open together in Atlantis.

Monday, February 22, 2010

Default toolbar commands

As you probably know, you can customize the Atlantis toolbars through the "Tools | Toolbars..." menu command. You can remove the toolbar buttons that you do not use, add the command buttons that you need, move the buttons around to your convenience. And you can also restore the default set of original toolbars using the "Restore Default" button in the "Tools | Toolbars..." dialog.

Obviously this default set of toolbar commands is the one you find when you make a clean install of Atlantis. It will be changed in the upcoming version of Atlantis 1.6.5.1. Here is how the Main set of toolbar commands will look like (click to enlarge):


And the new Alternative set (which is displayed when you press the Ctrl key twice, or click the "Switch toolbars" button):


The "Switch toolbars" and the "Go to" buttons will also look differently:

Switch toolbars

Go to

Note that this new default set of toolbar commands will not affect the existing installations of Atlantis. If you want to use the new default set of toolbar commands, you will have to click the "Restore Default" button in the "Tools | Toolbars..." dialog.

This new default set of toolbar commands has already been included in the latest beta version of Atlantis.

Thursday, February 18, 2010

Page breaks in eBooks

EPUB – the format in which Atlantis saves eBooks – is a reflowable format. This means that all EPUB eBooks are actually formatted as a continuous flow of text without predefined page boundaries. This is so that EPUB files will naturally display properly on all devices regardless of screen size, - from the tiniest mobile phones to the biggest monitors of desktop computers.

But in practice most eReaders "paginate" the EPUB files before displaying them: they divide the book contents into separate "pages" according to their own native display size and settings. Consequently, eBook authors do not have much control over the way their books get paginated in a particular eBook reader. Before actually opening the eBook in an eReader, it is impossible to predict how many pages a particular eBook will have on that eReader and on which page a particular paragraph of the source document will appear.

This said, there are still a couple of things relating to eBook pagination that you should keep in mind when you design an eBook.

Normally eReaders paginate books with "optimal fill": they create a new "page" only when there is no more space for text on the previous page. Even then, you might sometimes notice an unintended break in the middle of a page. To explain this, we need to take a deeper look at the inner workings of EPUB files.

As a matter of fact, all eBooks in the EPUB format are actually ZIP files with .epub as a substitute file extension. If you change the extension of an .epub file to .zip, you can open it with any ZIP software or directly with Windows Explorer, if you have Windows XP or higher.

Now all EPUB files generated by Atlantis contain a "Meta-inf" and a "Ops" folder, plus a "mimetype" file:


The actual contents of the eBook – text and images – are stored under the "Ops" folder. You will always find at least one file with the .html extension within that folder, but sometimes there will be multiple .html files:


Each of these .html files represent a fragment of the eBook. If you extract them from the EPUB-ZIP file, you can view them in any Web browser. eReaders naturally display the contents of each .html file as a continuous flow of text. But at the same time, most eReaders will never put the contents of multiple .html files on the same "page". In other words, eReaders display these neighboring .html files as if there was a page break between them.

So the more HTML files are included in an EPUB file, the more unintended page breaks there will be in the eReader display. This is why Atlantis always tries to divide the document contents into as few .html files as possible when it generates an EPUB file. In many cases, Atlantis creates a single .html file for the entire book contents so that your EPUB file won’t get displayed with unintended page breaks. But there are a few cases when Atlantis has to save the eBook contents to multiple .html files:

1) Atlantis creates a separate .html file for any paragraph from the source document containing nothing but a "big" portrait-oriented picture (a picture whose width is at least 300 pixels and height at least 400 pixels, or whose height:width ratio is in the range 1.1 to 1.7). The first such picture of the source document is also treated by Atlantis as the book cover image. Let’s suppose for instance that one of the paragraphs in a source document contains nothing but a 300x400 or 400x500 pixels picture. Atlantis will save this paragraph (and of course the included picture) to the EPUB file as a separate .html file. This is done in order to allow proper display of big pictures on devices with small screens.

2) Some eReaders are unable to load HTML files larger than 300 KB. Atlantis takes this into account when the source document cannot be saved to an EPUB file as one single HTML file lighter than 300 KB. In such cases, Atlantis splits the book contents into several .html files, each smaller than 300 KB if necessary.

So now you know when and why Atlantis might save a source document to an EPUB file including multiple .html files. As a result, that EPUB file will display with corresponding page breaks in the current eReaders.

You might ask "what if I want to insert page breaks in my eBooks myself?”

It is done very simply. Just create manual page breaks in the source document, and Atlantis will automatically save matching page breaks to the EPUB file.

As you know, there are 2 ways to create manual page breaks in source documents in Atlantis. You can press the Ctrl+Enter hot key and insert a "page break" symbol in the document: any text that follows a "page break" symbol will automatically appear on the next page. But there is another and preferable way to create a manual page break in a document: it is by enabling the "Page break before" attribute in the format of a particular paragraph. When you want a paragraph to be always displayed at the top of a page, choose the "Format | Paragraph..." menu command, and check the "Page break before" box on the "Line & Page Breaks" tab:


Quite often this attribute is enabled by default for the "Heading 1" style (this can be done through the "Format | Style... > Heading 1 > Modify... > Paragraph..." dialog). In this way, all the book chapters preceded by a "Heading 1" paragraph (the chapter "heading") start on a new page.

Monday, February 15, 2010

"Print layout" vs "Print preview"

Atlantis Word Processor can display documents in the Print Layout view mode: documents are displayed as a sequence of pages, each page being seemingly represented on a separate "paper sheet".
But you also have a Print Preview mode at your disposal through the "File | Preview..." command, or the corresponding toolbar button , or the associated hot key Ctrl+F2.

You might have noticed that in most cases documents look identically under the standard Print Layout view mode and under the Print Preview mode. Why then have the Print Preview mode at all if this mode produces the same display as the standard Print Layout mode?

It is true that these two view modes are very similar, but there are still differences:

1) Under the Print Preview mode, Atlantis displays documents as closely as possible to what you will get when the documents are actually printed to paper. This is important because all printers have proprietary "physical margins" beyond which they are unable to print. So if you want your documents to be printed correctly, the page margins of your documents should not be smaller than the minimal margins allowed by your printer. When you specify "too small" margins in the "File | Page Settings..." dialog, Atlantis automatically suggests to correct them:


Now you can ignore these suggestions, and still define margins that are "too small" for your printer. This is when the Atlantis Print Layout and the Print Preview modes behave differently. The Print Layout view will display the page margins as set in the "File | Page Settings..." dialog but it won't show you that they are "too small" for your default printer. On the contrary, the Print Preview automatically shows which areas of the document pages will not get printed, i.e. will actually be cut off on printing:


2) As you probably know, you can use the "Color" tab of the "Tools | Options..." dialog to customize the colors used by Atlantis to display page background and text in the document window. But these special colors are only meant for on screen convenience: they might not print AS IS. This is also why these special colors never affect the display in the Print Preview mode. As the name indicates, under the Print Preview mode the documents are simply displayed with the colors they will have when printed to paper, not as you want them to appear on screen. So the page background is always white under the Print Preview mode, and text formatted with the "automatic" font color is always black.

3) When "Update fields on print" is checked in the "Tools | Options..." dialog:


and you activate the Print Preview mode, Atlantis automatically updates all the "updatable" fields of the current document. The page numbers get updated within the tables of contents. The date & time-related fields and page references also get updated. Etc.

4) Atlantis remembers the zooming factor that you last used under the Print Preview mode, and automatically reloads it the next time you activate this mode.

Tuesday, February 9, 2010

Hanging indents (2)

We recently posted a blog showing how to create hanging indents in Atlantis with a few tab stops and Ctrl+T to align lines vertically. The examples we gave were basic "one-tier" structures:


But at times you might want to build "two-tier" hanging indents like this one:


Here is how to proceed in a few easy steps:

1. Make sure the "Special Symbols" mode is on in the Atlantis document window (Ctrl+Shift+8). All the typed characters will be visible: this will make things easier for you.

2. Type the whole of your text like this:


Note that the first-level paragraphs are all preceded by a tab character: this is because you want all these (three) items to align vertically. Also note that the second-level paragraphs have lines separated by "line breaks" (Shift+Enter).

Obviously, the above "draft" text needs to be formatted further to achieve the desired effect.

We need to push the second-level lines (the literary works) to the right so that they align vertically as intended (under their respective author's name).

Let's place the insertion cursor within the first batch of these second-level lines (in our example, within the works of Joyce), and press Ctrl+M repeatedly until we achieve the desired alignment, like so:


We now need to repeat the same procedure for the second and third batch of second-level lines (in our example, within the works of Wolf and Lowry), with this as a result:


The second and third first-level paragraphs now need to be pushed to the right to align them vertically with the first first-level paragraph. This is done by selecting them both first:


We can now press Ctrl+M repeatedly until we achieve the desired effect:


Here is the same text with the "Special Symbol" mode off:


This tip is also available as a downlodable document in the RTF format.

Monday, February 8, 2010

Atlantis 1.6.5.1: Miscellaneous improvements

Besides a new Draft view mode, the latest 1.6.5.1 beta version of Atlantis Word Processor includes various other improvements:

1) As you probably know, the Atlantis "Open Document" and "Save Document As" dialogs can display a "Readable preview" of the selected document:


In previous versions of Atlantis, this "Readable preview" was displayed as a continuous flow of text without page margins and breaks, but in practice it often included big undesirable gaps:


These unwanted gaps are no longer present in the latest 1.6.5.1 beta version of Atlantis. The "readable" previews now truly display a continuous flow of text:


2) A similar improvement affects the Print Layout view mode. Previously if a document had several sections each with different page settings (for example if some pages had "portrait" orientation and others "landscape" orientation), Atlantis often displayed unreasonably big gaps between neighboring pages:


This won't happen any more in the new version of Atlantis. Neighboring pages will always be displayed with minimal interpage spacing.


3) At times, a horizontal scrollbar was present at the bottom of the document window even when no such scrolling was possible (this happened when the active document was displayed under any zoom type except the "Page width" or "Text width" zoom types):


In the new Atlantis version, the horizontal scrollbar will only appear purposefully. Accordingly, you'll get more vertical screen space when the scrollbar is not displayed.

Saturday, February 6, 2010

The Window is the Limit

If you have already grabbed a copy of the latest beta version of Atlantis with a new Draft view mode, you probably noticed many differences between this new Draft view mode and the more traditional Print Layout view mode. But these two view modes had one thing in common. Under both modes, the text was wrapped according to the document "page width" as found in the "File | Page Settings..." dialog. As a result of this "wrapping to page width", quite a lot of window space was wasted under the Draft view mode. The following screen capture illustrates this (click it to enlarge):


As you can see, the screen area located to the right of the red line was not used because it lies beyond the set "page width" of the document. This is how the Draft view mode of Atlantis works by default. This wasted space is the price to pay to have accurate indication of tab stop positions and paragraph indents (namely the right indent) on the horizontal ruler of the document window.

However, if you don't need exact measurements on the horizontal ruler under the Draft view, and you'd rather have the document text extend from left to right edge so that no screen space is wasted, a new option of the latest beta version of Atlantis allows you to have such a display. This new option is available on the "View" tab of the "Tools | Options..." dialog:


You will check this "wrap to window" option if you want the document text to be wrapped to the right edge of the document window rather than to the right edge of the horizontal ruler under the Draft view mode:


Note that this latest beta version of Atlantis has two new buttons located above the vertical scroll bar of the document window:


You can use these buttons to switch between the Draft and Print layout view modes of Atlantis.

As always, the Betatesting page of the Atlantis site is the place to look for the latest beta version of Atlantis Word Processor.

Wednesday, February 3, 2010

Release of Atlantis 1.6.5.1 (beta)

Atlantis Word Processor 1.6.5.1 is now available for betatesting.

This version of Atlantis introduces a new Draft viewing mode.

You can find details on this new version of Atlantis on the Betatesting page.