Tuesday, July 6, 2010

Heading-less chapters

If you are using Atlantis Word Processor to create eBooks, you certainly know that the eBooks created from Atlantis in the EPUB format customarily display with a "standalone" table of contents (or "navigation center") allowing readers to switch between chapters:


Adding items to these tables of contents is extremely easy in Atlantis. All you need to do is to format the chapter headings with the "Heading 1" style in the source document. When it creates a table of contents for an eBook, Atlantis automatically creates links (actually hyperlinks) to all the Heading style paragraphs present in the book.

This is OK for most ordinary purposes, but at times you might want a heading-less chapter from the source document to be included in the eBook table of contents. This might be the case, for example, with the copyright notice. Here is an example:


Click here to download a sample RTF document with the above copyright notice.

If you save this sample document as eBook in the current official version of Atlantis, the copyright notice will be kept in the eBook text, but the eBook table of contents itself won't include any link to the copyright notice. Because this notice is not preceded by a Heading style paragraph in the source document, Atlantis does not treat it as a separate book chapter and does not include it in the eBook TOC (Table Of Contents).

So if you wanted Atlantis to include a link to the copyright notice in the corresponding eBook TOC, you normally would have to turn the copyright notice into a separate chapter, and insert a Heading style paragraph before the notice. The text of that paragraph would automatically appear in the eBook TOC as a link to the copyright notice.

However, most authors will probably find it inappropriate to have big Heading titles heralding simple copyright notices in their eBooks. We have looked into this problem, and the next release of Atlantis Word Processor will offer a convenient and intuitive way to create TOC hyperlinks to heading-less chapters present in eBooks.

Here is how this will be done:

1) Create an ordinary Heading style paragraph right before the target text (in our example, right before the copyright notice). Type any suitable text (the text that you want included as hyperlink in the eBook TOC):


2) Select that heading text:


3) Choose the "Format | Font..." menu command, check the "Strikeout" box, and click OK:


This will apply the "strikeout" formatting to the heading:


Click here if you want to download a modified sample RTF document with the copyright notice preceded by a "struck-out" heading.

This is all you'll need to do! The "Copyright" Heading text (and corresponding hyperlink) will automatically be present in the eBook table of contents, but the Heading itself will not appear on the related eBook page:


So by formatting Headings in the source document with "strikeout" before saving it to the EPUB format, you will instruct Atlantis to exclude these "struck-out" Headings from the eBook text, but still use them to build the eBook table of contents itself.

This "strikeout" method will come in handy to include elements such as "Front Cover", "Title page", "Copyright", "Dedication" in the eBook TOCs, without promoting them to full-fledged Heading paragraphs on the eBook pages themselves.

Support for heading-less chapters in eBooks has already been included in the latest beta version of Atlantis. You can download it from the Betatesting page of the Atlantis Word Processor site.

Tuesday, June 29, 2010

Fallback fonts in EPUBs

When you save a document as eBook in Atlantis, information about the fonts used to format the document text is saved to the eBook file. Accordingly, and for example, an eBook saved from a document formatted with "Times New Roman" will include a similar indication in its file. This is how eBook readers know which fonts they should use for the display of each eBook.

That sounds fine in theory, but in real life eBook readers will rarely display your eBooks with the fonts used in the original documents. This is because the required fonts are not always available on the eBook readers. So for example if "Calibri" was specified as the font to be used for the display of one of your eBooks, and the eBook reader does not have this font, it will have no choice but to display the eBook text with one of its default fonts. In such cases, your eBook might display quite differently from what your original intention was.

The first solution that comes to mind is to include all the required fonts in the eBook files, i.e. embed the fonts in the eBooks. Atlantis can easily embed fonts in eBooks – there is a dedicated option in the Atlantis "Save as eBook" window:


Unfortunately, embedding fonts not only makes the eBook files much bigger but also does not guarantee that the eBooks will display in the intended way in all eBook readers. This is because a few eBook readers (including the iPad) do not support font embedding. No matter how many fonts you embed in your eBook files, they will not be used by these eBook readers.

There is no perfect solution to this problem. But a partial solution is still possible. It will make your eBooks display closer to the original look on the various eBook readers: the next maintenance release of Atlantis – 1.6.5.2 – will not only save the original font names to the eBook files but it will also include information about the corresponding generic font families. In practical terms, the following keywords will be associated with the font names, depending on which family they belong to: serif, sans-serif, cursive, fantasy, or monospace. In this way, the eBook readers will be able to choose the closest substitutes from the available fonts.

This change has already been included in the latest beta version of Atlantis Word Processor.

Wednesday, June 23, 2010

Release of Atlantis 1.6.5.2 (beta)

Atlantis Word Processor 1.6.5.2 is now available for betatesting.

Atlantis 1.6.5.2 is a maintenance release with minor changes and fixes.

You can find details on this new version of Atlantis on the Betatesting page.

Friday, June 18, 2010

New EPUB logo

The EPUB format in which Atlantis Word Processor creates eBooks, is steadily becoming the eBook industry de facto standard. The position of the EPUB format recently strengthened even further with the release of the bestselling tablet computer iPad which also supports this eBook format.

But even then, and as surprising as it might sound, the EPUB format had no official logo until now.

So, IDPF, the creators of the EPUB format, recently announced an EPUB logo contest. Anyone could enter the competition, and suggest a logo.

The contest is now closed, and the winner is Ralph Burkhardt from Germany. Here is his suggested logo, now adopted as the official logo of the EPUB format. We find it quite nice. What do you think?

Friday, June 4, 2010

iPads and breaking pages for sure

If you read our recent blog post about page breaks in eBooks, you know how to make sure that your eBooks have page breaks at the desired locations. All you need to do is to add manual page breaks at the appropriate locations in your source documents in Atlantis before saving them as EPUB files.

Now whenever you save a document as eBook in Atlantis, the manual page breaks in that document are saved to the corresponding eBook file using the "page-break-before: always" CSS attribute.

Until recently, this CSS attribute was supported and correctly rendered by all major eBook readers. In this way, all eBooks created in Atlantis displayed correctly in eBook readers: the page breaks present in the original documents were also present in the corresponding eBooks when viewed in the current eBook readers.

But as you know, a new tablet computer from Apple – the iPad – has recently hit the markets. iPads can be used as eBook readers. Now it so happens that iPads do not create page breaks in the text flow when they encounter a "page-break-before: always" CSS attribute. So as things stand, your eBooks will most likely display as a continuous flow of text on the iPads even if you designed them to have page breaks between their "chapters", for example.

To solve this conundrum, the next release of Atlantis Word Processor will save page breaks to eBooks differently, i.e. in a way supported by all major eBook readers, including the iPad. Atlantis will create a new XHTML file within the eBook package whenever it finds a page break in the original document. This is because all eBook readers automatically display a page break between neighboring XHTML files found in EPUB packages. There will be more XHTML files within the EPUB packages created by Atlantis, but the page breaks saved to EPUBs in this way will be displayed as such by all eBook readers, irrespective of whether they support or don't support the "page-break-before: always" CSS attribute.

To sum up, all you'll have to do in order to have page breaks saved in this new way in your eBooks, will be to save or resave your original documents as eBooks in any next version of Atlantis.

Friday, May 21, 2010

Look-alikes

We quite often feel the need to emphasize specific fragments of documents in order to draw the reader's attention to them. To achieve this, we format them in a special way so that they stand out from the rest of the text:


In this particular example, the "extra formatting" of the word "immediately" includes bold, red font color, and underline. Applying such a formatting to a selection of text is as easy as ABC. There are multiple ways to do so in Atlantis: you can use the "Format | Font..." menu command, various font formatting toolbar buttons, keyboard shortcuts, the Format Palette of Atlantis, etc. No doubt you are familiar with these methods.

Now let's suppose that we want to emphasize a different text fragment in the same way. Let's suppose that we have the following text and want to format "Your site will be banned" in the same way as "immediately":


Of course, we can repeat all the actions that we performed to format the word "immediately".

But things can be a lot easier in Atlantis: we can use special copy/paste commands.

As you know, Windows includes a temporary storage place for clips of data, namely the Windows Clipboard. All applications, including Atlantis, can place fragments of document onto this clipboard, so that they can be retrieved at a later time and pasted into a different location. This is the standard copy/paste operation.

On top of that, Atlantis has a special proprietary clipboard called the Font Format Clipboard. It works just like the standard Windows Clipboard, except that it stores font formatting properties instead of text fragments.

Here is how it works.

First, let's click within the word whose formatting we want to clone (the word "immediately" in our example):


Then we can press the "Copy font format" toolbar button, or hit the associated hot key (Ctrl+Shift+C). Atlantis will automatically place the font formatting properties found at the current cursor location (i.e. the font formatting of the word "immediately") onto its Font Format Clipboard.

Of course, as you would expect, there is a corresponding "Paste font format" command.

We must first select the target text fragment:


Then we can press the "Paste font format" toolbar button, or hit the associated hot key (Ctrl+Shift+V). Atlantis will automatically apply all the font formatting found on its special font format clipboard to the selected text:


Deselecting text by clicking anywhere in the document let's us see that both text fragments ("immediately" and "Your site will be banned") are now formatted identically:


The font formatting stored on this special clipboard remains available until you change it. In this way, you can apply identical font format to as many text fragments as you wish. Simply select a target fragment, and use the "Paste font format" command of Atlantis.

You can even apply formatting to multiple text fragments at one go. First, select them as a multiple selection:


Then press the "Paste font format" toolbar button, or hit Ctrl+Shift+V. They will all be reformatted in the same way:


Friday, May 14, 2010

Portable fonts

As you know, Atlantis ranks as one of the most portable word processors available: you can easily install Atlantis with your favorite settings to a memory flash drive and Atlantis will travel with you wherever you go.

Atlantis will work just as smoothly whether it is run from a hard drive or a flash drive.

However, you might experience minor inconveniences related to fonts when you run Atlantis from a plugged-in flash drive. The host system might miss some of the fonts that you commonly use to format your documents, and Atlantis will not be able to format, display or print correctly any document using those "missing fonts".

No need to worry though: the next release of Atlantis will introduce a solution for such font-related problems in portable copies of Atlantis.

All you will have to do is to place the files of your favorite fonts in the home folder of Atlantis on the flash drive: no matter how "un-common" these fonts will be, Atlantis will be able to use them even if they are missing from the host system.

Here is exactly how things will work.

First, you will have to copy the desired TrueType font files from your hard disk to the home folder of Atlantis on the flash drive. Font files are normally stored on your hard disk under the "C:\Windows\Fonts" folder, and TrueType font files have either the .ttf, .otf, or .ttc file extension. The home folder of Atlantis is where the main executable file of Atlantis (Atlantis.exe) is stored. The font files can be placed directly in the root of the Atlantis home folder on the flash drive, or in a dedicated "Fonts" subfolder.

Then, when you launch Atlantis from the flash drive, it will automatically scan for font files under its home folder (including subfolders), and will temporarily load the fonts into the memory of the host system. All the loaded fonts will immediately be available in Atlantis, and in any other application that you run on the host system. Note that these fonts are loaded only temporarily into the memory of the host system: they are unloaded from it as soon as you close the portable instance of Atlantis.

The U3-smart portable version of Atlantis will also support font loading from a flash drive. But since the home folder of Atlantis on U3-smart drives is normally hidden, you will have to place the fonts files in the "Documents" folder of the U3-smart drive.

So Atlantis will not only travel with your favorite settings, it will also travel with your favorite fonts. As usual with Atlantis, you will have the best of all possible worlds! :)

Tuesday, May 4, 2010

Fonts, fonts, fonts

Unlike plain text editors, word processors allow you to format text with different font faces (or simply fonts). This is such a basic procedure that even complete newbies very quickly learn what "Arial" or "Times New Roman" are and how to apply them to text.

But to a lot of users, managing "fonts" is still an unclear business.

First, how do you know which fonts are currently available in Atlantis?

You can either press Ctrl+Shift+F or use the mouse to open the "Font" toolbar drop-down. Or you can open the "Format | Font…" dialog (Ctrl+D). You then get a complete listing of the fonts that you can use to format text in Atlantis.

Now Atlantis users periodically ask "How do I add fonts to Atlantis?”

This is an easy one: you don't!

You add fonts to your Windows system, not to Atlantis.

Atlantis does not have its own collection of fonts. Atlantis simply supports all the "TrueType" fonts available on your Windows system.

If you want to add fonts to your system, you first need to go to the Windows Control Panel and display the "Fonts" applet (click here if you do not know how to access the Windows Control Panel). This will give you a complete list of the fonts installed on your system. For word processing purposes, you are only interested in the fonts that are tagged with the "(TrueType)" caption. These will either have a "TT" or "O" icon ("TT" stands for "TrueType", and "O" for "OpenType" but they all actually belong to the "TrueType" category):
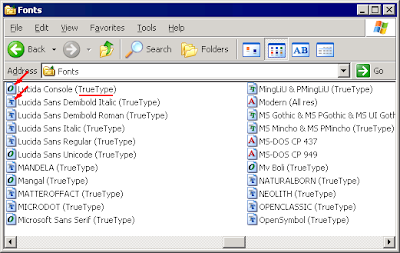

The TrueType fonts available on your system are actually special files with the ".ttf" extension (for example, the file for "Times New Roman" is named "TIMES.TTF").

Of course, to add (install) new fonts to your system, you need to have the corresponding files on your computer hard drive. ".ttf" files are often stored within ".zip" files. You need to uncompress them to one of your disks. Font files, both free and paying, can be found on the Web (you'll find links to sites with free downloadable fonts on the Useful Links page of the Atlantis site).

The procedure is then straightforward.

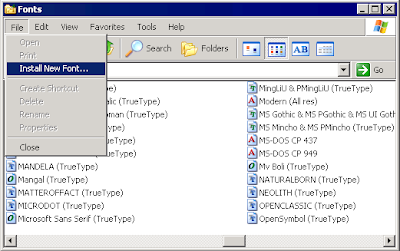
Choose the "File | Install New Font..." menu command in the "Fonts" applet of the Windows Control Panel:

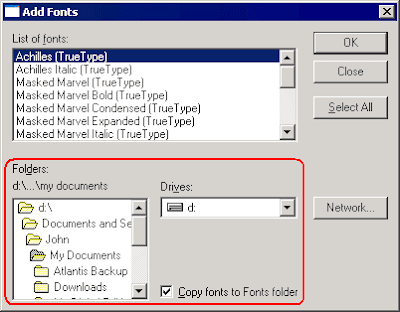
Use the "Folders" and "Drives" boxes of the "Add fonts" dialog to navigate to the folder where you have stored the ".ttf" files that you want to install. Windows will give you a listing of the fonts it found:

Click the "Select All" button:
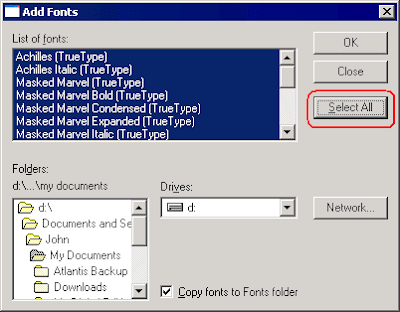

and OK out of the "Add fonts" dialog.

The newly installed fonts will immediately appear among the available fonts in Atlantis. You do not even need to close and restart a running instance of Atlantis. Atlantis is automatically informed by Windows about any newly available fonts, and Atlantis picks them up just as automatically. The new fonts are visible in the various font lists of Atlantis:
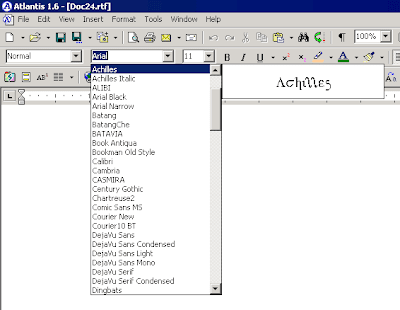
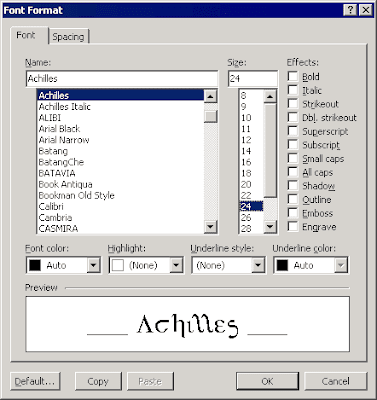


So after installing new fonts on your Windows system, you can immediately start using them to format your documents in Atlantis.

Now you might never add fonts to your system and stick with the standard set of fonts shipped with your version of Windows. But even then, the likelihood is that you will use only a fraction of all the available fonts to format your texts in Atlantis. Albeit unwittingly, you will have "favorite" fonts. There is just one small snag here. Your "favorite fonts" will be scattered throughout the alphabetically-sorted complete list of all available fonts. That list will often be overlong, and selecting the desired font from that list will inevitably be awkward and time-consuming.

But don't despair! Atlantis offers a most practical solution to this problem: you can tell Atlantis which of the available fonts are your favorites. They will then be included in a shortlist of your favorite fonts.

Here is how to proceed:

1) Choose the "Tools | Options..." menu command of Atlantis, and click the "My Favorite Fonts..." button on the "General" tab:
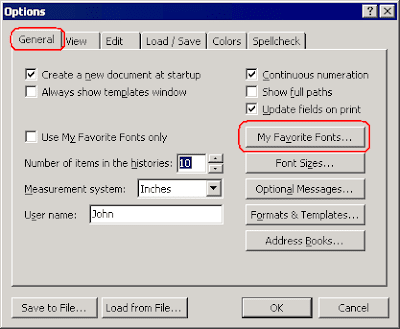

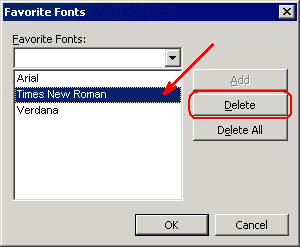
This will display the "Favorite Fonts" dialog. By default, it includes three "favorite" fonts: Arial, Times New Roman, and Verdana:
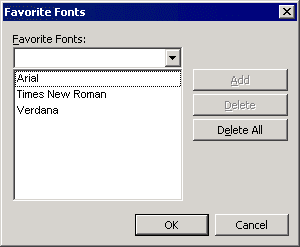

2) To remove a font from that list of Favorite Fonts, click to select it, then press the "Delete" button:

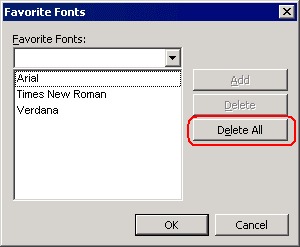
To remove all fonts from the list of Favorite Fonts, press the "Delete All" button instead:

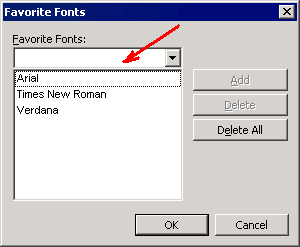
3) To add a new font to your Favorite Fonts, pull down the list of all installed fonts (click the down arrow to the right of the topmost box in the "Favorite Fonts" window):

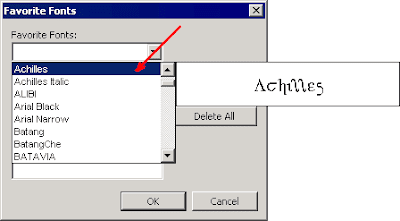
Click to select a font of interest:

Then press the "Add" button:
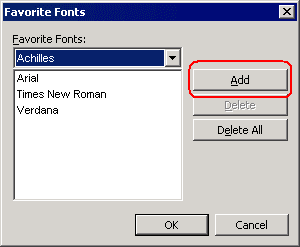

The new font will appear among the Favorite Fonts:
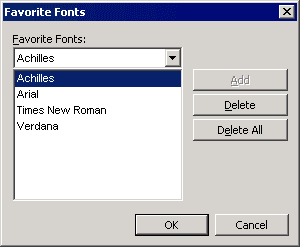

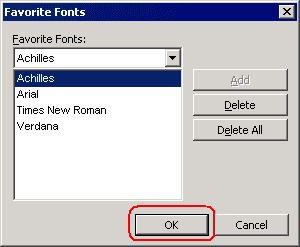
Of course, to register your changes to the Favorite Fonts you need to OK out of the "Favorite Fonts" dialog:


Now you might ask "how will my Favorite Fonts be displayed in Atlantis?"

By default, your Favorite Fonts will be systematically displayed at the top of the Atlantis font lists:
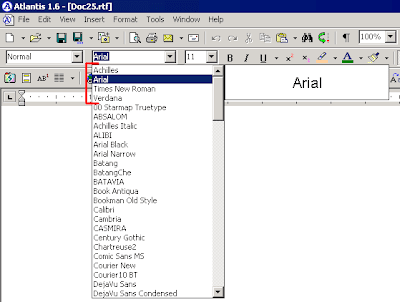
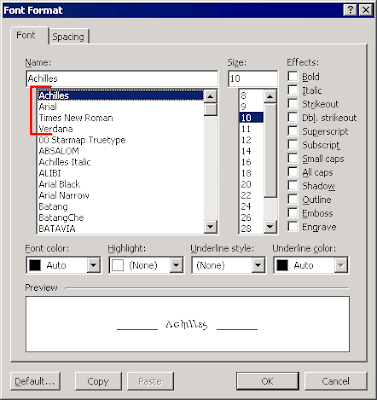


This obviously makes it easier for you to select any of your Favorite Fonts from what would otherwise be an overlong font list.

But Atlantis offers you a lot more practicality in this respect!

The "General" tab of the "Tools | Options..." dialog includes a "Use My Favourite Fonts only" option:
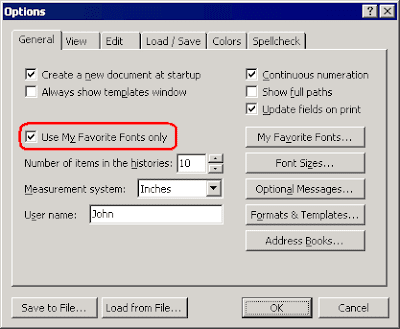

If you activate this option, the font lists in Atlantis will offer nothing but your Favorite Fonts:
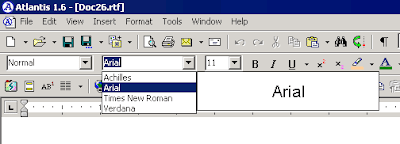
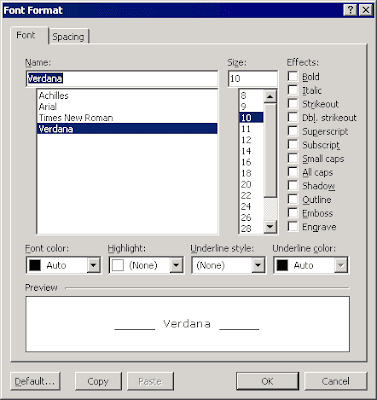


If you don't intend to use any other font in your documents, this will make font selection a breeze. Note that this isn't so restrictive as it might sound: as we explained above, you can always add new fonts to the list of your favorite fonts.

Also note that activating the "Use My Favorite Fonts only" option does not affect existing documents previously formatted with other fonts than your Favorite Fonts. These documents will still be displayed as intended originally. The "Use My Favorite Fonts only" option only changes the number of fonts that Atlantis will offer to format or reformat text.

Favorite fonts can be applied directly from the keyboard. For this, you first need to associate each (or some) of your favorite fonts with a hot key. Here is how to proceed:

1) Choose the "Tools | Hot Keys..." menu command.

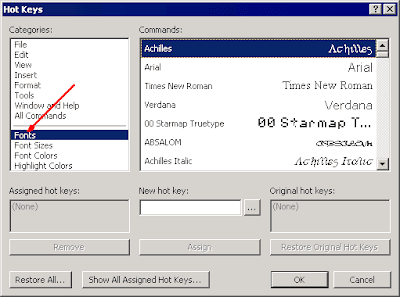
2) Select the "Fonts" category:

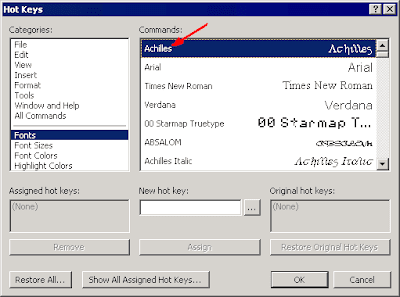
3) Click to select the font of interest:

4) Click in the "New hot key" box:
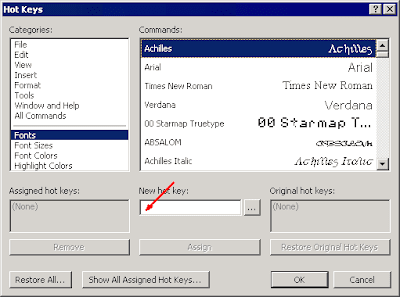

5) Press the desired hot key on your keyboard.

Alternatively click the "..." (three dots) button next to the "New hot key" box:
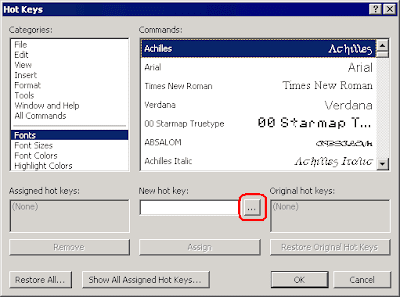

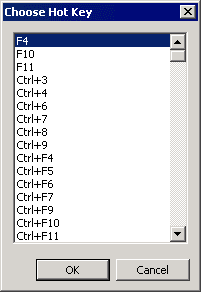
and choose any unused hot key from the list:

6) Press the Assign button:
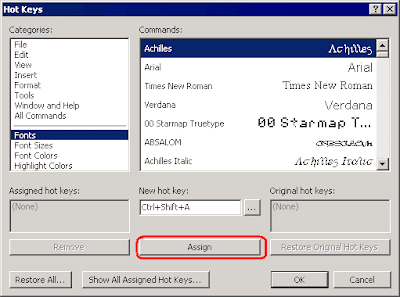

7) OK out of the "Hot Keys" dialog.

After this you'll be able to apply your favorite fonts to selections of text with a simple press of the associated hot keys (in the above example, pressing the Ctrl+Shift+A hot key will format text with the "Achilles" font).

Finally a note regarding "uncommon" (rare) fonts.

If you are planning to send your documents to people, be careful to avoid formatting them with fonts unavailable on their systems. Documents formatted with "fonts missing on the destination system" will often display incorrectly, and in any case, not as intended. This is because font files are not embedded in RTF or DOC files. When documents are formatted with a missing font, word processors display them with substitute fonts chosen from the ones available on the current computer. So it is always preferable to avoid using "exotic fonts" in documents meant to be read on other systems. It is advisable to stick with a set of common fonts.

However, if you save your Atlantis documents as PDF, they will display correctly on any system since fonts automatically get embedded into PDF files.

And if you use Atlantis to save your documents as eBook, you'll have an option to embed the required fonts in the eBook file. In this case, your EPUB files will automatically be displayed with the original fonts.

Monday, April 26, 2010

The feel of paper

All the time, through thousands of years of existence, humans have tried to record their knowledge, thoughts, impressions – in other words, the information that was important to them – to make it available to other humans. As human civilization evolved, different ways to store information were used. Our prehistoric ancestors painted on cave walls. Later, people carved texts on wax, clay or stone. Egyptians wrote on papyrus, others on parchment scrolls. Then for centuries, and especially since Gutenberg invented the printing press in mid-fifteenth century, paper books have been our main storage medium.

But following this we have seen the advent of fast personal computers and digital screens, and we might think that the age-old dominance of printed books is coming to an end. Just as floppy disks are no longer used to store or transfer information between computers, will the same happen to printed books? Will they be replaced by their electronic counterparts, the eBooks?

To many of us, eBooks are incommensurably superior to traditional paper books. eBooks are browsed or searched much more easily. eBooks are also easier to publish: they don't require printing, binding, they don't waste paper and ink, they will always be more compact than printed books. Any modern eBook reader with a size not larger than an average paper book can already store an amount of eBooks equivalent to a small library of printed books. eBooks have plenty of advantages over printed books. Some people believe that in a not too distant future printed books will only be kept in museums and private collections of bibliophiles. Who knows, maybe paper books are like dinosaurs whose time of extinction is nearing?

However, we know that there are still people who will always prefer the smell of ink and the feel of paper of the printed books they knew in "the good old days".

Where do you stand on this?

Below are various links to topical articles. We hope they'll help you form an unbiased educated opinion.

Some Thoughts About E-Reading

Ebooks vs. Paper Books

E-book vs. Paper Book

Publishing: ebooks vs. Paper Books

Environmental Impact Of E-Books vs. Paper Books

Ebooks Versus Paper Books: The Pros and Cons

How Green Is My iPad?

Testing the iPad's Trip-Worthiness

Tuesday, April 20, 2010

Automatic text wrapping

There is one thing which all word processors do, and which is as natural for word processors to do as it is natural for rivers to flow. It is automatic text wrapping. What does this mean? "Automatic" means that you don't have to worry about it, word processors do it automatically for you. "Text wrapping" means that all newly typed text is carried over to the next paragraph line as soon as that text becomes too long to fit the screen. As a general rule, the maximal width allowed for a paragraph line is limited by the width and margins of the current page. When new text cannot be added to a line because it would exceed the boundary set for the lines of the current paragraph, word processors automatically wrap the text around. It isn't actually the case, but things then look as if line breaks had been inserted to wrap text around:


In the above picture, these virtual line breaks have been marked with red arrows. We say "virtual" because word processors do not automatically insert hard-coded line breaks in documents. "Virtual" or automatic line breaks terminating paragraph lines are dynamic: they are used only temporarily to lay the text out in the document window, or on the pages sent to the printer. When you edit a paragraph and add or remove words, word processors automatically create new automatic line breaks allowing the paragraph text to nicely reflow from one paragraph line over to the next line. Note that these ad hoc automatic line breaks are never saved to the document files. The paragraphs of saved documents only contain a continuous flow of text. But line breaks are automatically created again when you open a document.

Even though most of us do not even notice it, this is how all word processors work, including Atlantis.

Now there are cases when you might want such automatic line breaks to be saved to the document files. The most typical case is when you save a document as a plain text file. When plain text files are viewed in plain text editors, their paragraphs are either displayed as one continuous unbroken line, or wrapped around at window edge or after a set column value. But in any case the resulting layout would most likely be different from the one found in Atlantis: the line breaks would be inserted in different places.

If it is important to you to have the same line breaks in plain text editors as you get in Atlantis, you need to place actual hard-coded breaks at the end of each line in the original document in Atlantis. Here is how this can be done:

1. Open the target document in Atlantis, and select the fragment of document (one or multiple paragraphs) whose automatic line breaks you want to replace with hard-coded breaks.

2. Click the "Split paragraphs" toolbar button, or press the Ctrl+Shift+K,U hot key. Atlantis will automatically place paragraph end marks at the end of each paragraph line within the document selection. Note that paragraph end marks are visible only when the "View | Special Symbols" mode is on:


If you then save your document as a plain text file, and open it in a plain text editor like Notepad, you will get the same text wrapping (line breaks) as you had in the original source document in Atlantis:


Note that the "Split paragraphs" toolbar button is by default available through the Alternative toolbars in Atlantis. You might need to press Ctrl key twice to access this toolbar button.

Also a note regarding the Ctrl+Shift+K,U hot key. It is a so called compound hot key in Atlantis. Compound hot keys are 4-steps hot keys. You must:

1. Hold the Ctrl and Shift keys pressed,
2. Press and release the K key,
3. Press and release the U key,
4. Finally release the Ctrl and Shift keys.

You will find more information on compound hot keys in the corresponding topic of the Atlantis Word Processor Help.

Tuesday, April 13, 2010

Automatic Q&A patterns

There are plenty of situations in real life, —hence in documents—, where questions alternate with answers in a regular manner: dialogs in movies, television and radio plays, court depositions, celebrity interviews, school tests, etc.

If you write this kind of documents or scripts yourself, you probably often wished there was a way to automate the task of entering the Q&A tags or the names of the characters in your dialogs. This is actually possible. You can use styles in such a way that a pattern of question and answer tags following each other is created whenever you press the Enter key. You won't have to type the Q&A tags or character names yourself. They will be inserted automatically.

We have composed a sample document demonstrating the use of styles to create automatic Q&A patterns. You can download this document from the Sample documents page of the Atlantis site, or by clicking the following direct link:

Questions and answers.rtf

Then open the document in Atlantis. The styles in this sample document have been designed in such way that you can create new "question" or "answer" paragraphs simply by clicking the Enter key. This sample document also contains detailed explanations and instructions.

Friday, April 9, 2010

Break gracefully (2)

In the previous blog post, we suggested using the "page break before" paragraph formatting attribute as a safe way to add manual page breaks to documents. But there is still one more way to insert manual page breaks "safely" into documents.

In Atlantis, a document can be divided into multiple sections, and each document section can have its own headers/footers, page size and margins, footnote/endnote settings, etc. Two neighboring sections are always separated with a special nonprinting symbol called Section Break. When the "View | Special Symbols" mode is on, the Section Break symbols are visible. They look very much like Page Break symbols:


When you insert a section break into a document, the corresponding section is automatically divided up into two sections at the current cursor location. Section breaks can be inserted through the "Insert | Break | Section Break" menu, with a choice of four different types:


When you choose the "Next Page" section break type, the newly inserted Section Break works in many ways like any ordinary manual Page Break: any text following the Next Page section break will automatically be carried over to the next page. But there is still one important difference. Section breaks never create the kind of formatting problems that we have seen are inherent in the use of manual Page breaks (see previous blog entry). This is because the Section Break symbols always terminate the paragraphs they belong to: they actually always function as paragraph end marks. In other words, the paragraph end marks (pilcrow symbols) terminating ordinary paragraphs:


are absent from the paragraphs containing section breaks. These are terminated by Section Break symbols instead.

As you might recall (see previous blog entry), a manual "Page Break" symbol not only signals the end of the page it sits on, but it is also the first part of a paragraph whose rest is automatically carried over to the next page. Such "Page Break symbol paragraphs" always straddle two pages. On the contrary, Section breaks never break paragraphs across page boundaries. This is why section breaks could never create the kind of problems we have seen are possible with ordinary manual page breaks.

So section breaks can create "safe" page breaks in a document. However, section breaks should not be used as a substitute for ordinary page breaks. This is because section breaks normally play a much more important role in a document than just creating breaks in the text flow. Each document section bears a lot of specific formatting properties. So new sections (and consequently new section breaks) should be created only when they are actually needed: for example, when you want to have a different set of headers/footers for a particular fragment of document.